Sidewinder Rebuild
Posted by Joe
|
Sidewinder Rebuild May 05, 2010 05:07AM |
Registered: 13 years ago Posts: 78 |
[DISCLAIMER: Please bear with me...this has become a lenghty post with loads of pictures. I am no way an expert on anything related to boat repair. Just an average "Joe" stumbling through his repairs. Many may laugh at my techniques, but I just hope my work/mistakes will help someone along the way.]
I've recently become a first time boat owner. I opted for a Sidewinder after seeing all the available information on this site. The boat I bought is sail# 327, I figure about a '69 or 70. It has many cracks in the cockpit floor that leak into the hull and the strips of wood are rotten. I'm planning on cutting out the cockpit floor and replacing the wood and encapsulating them with fiberglass. Then re-installing it. At first I thought of removing the top deck all together, but am considering this alternative method. Has anyone done such repairs or have any recommendations.
The good news is the hull only leaks at the rudder mounts and this seems like a simple repair after information I've found on this great site. My boat may sound like a wreck, but I have the original rudder, center board and sails. So I got that goin' for me.
If pictures can be posted I'd love to show my progress. Any ideas how to do this?
Edited 1 time(s). Last edit at 07/18/2010 04:35PM by Joe.
|
Re: Sidewinder Rebuild May 06, 2010 03:30AM |
Admin Registered: 18 years ago Posts: 187 |
Hi Joe,
Welcome to the forum. I'm glad you found us. I'm not expert enough to give you this kind of advice, but hopefully others can. There have been folks in here who have done marvelous work to fix problems like yours.
#327! A nice old one. I'm not sure about this wood. Can you attach a picture? When you post, you can "attach a file" (at least that should work, I've never tried it myself). I've never seen a sidewinder with wood on it.
If you want, keep a log of pictures about your repair and send it to me and I'll post the whole set in the sidewinder section of the site for others to learn from.
Paul
Webmaster: sailmfg.com
|
Re: Sidewinder Rebuild May 07, 2010 03:43AM |
Registered: 13 years ago Posts: 78 |
I wouldn't go so far as saying a "nice" old one, but it's definately "old".
I took some pics tonight and put them in "my files" but not sure what I can do with them. I've linked to some I've loaded in a facebook album on another post. But have not been able to embed them.
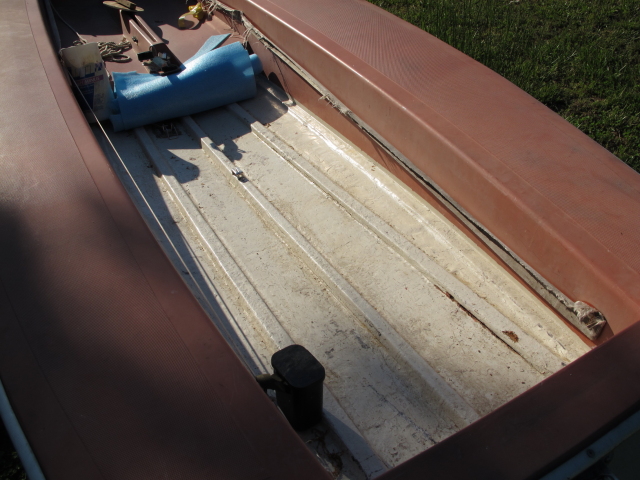
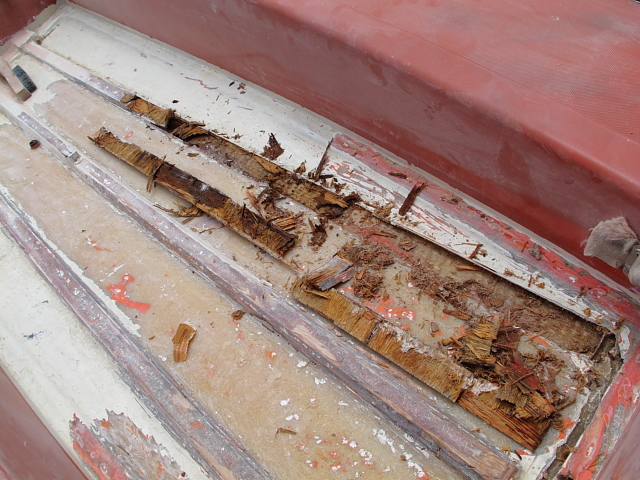
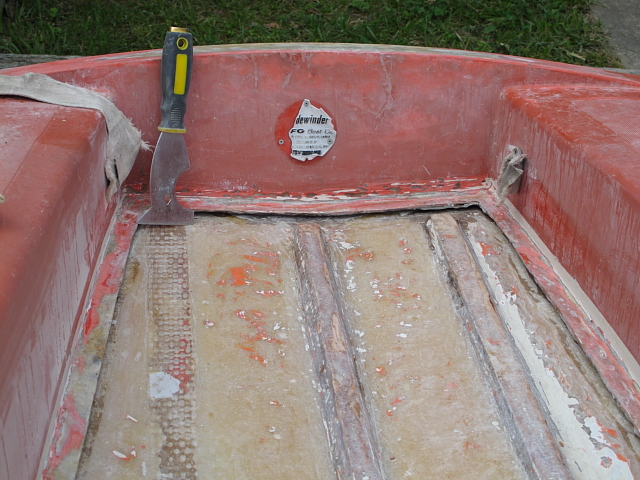
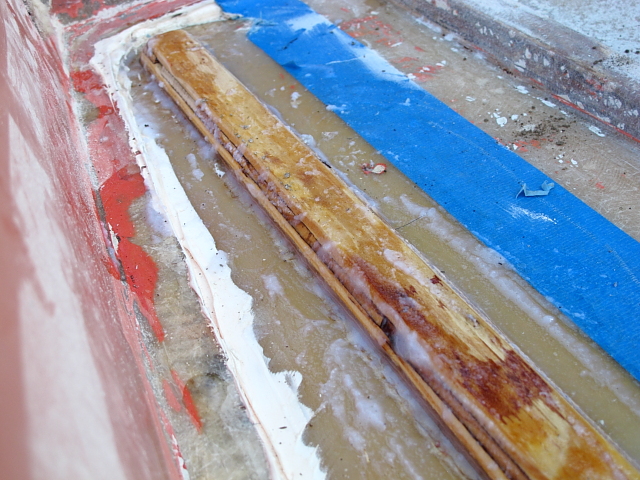
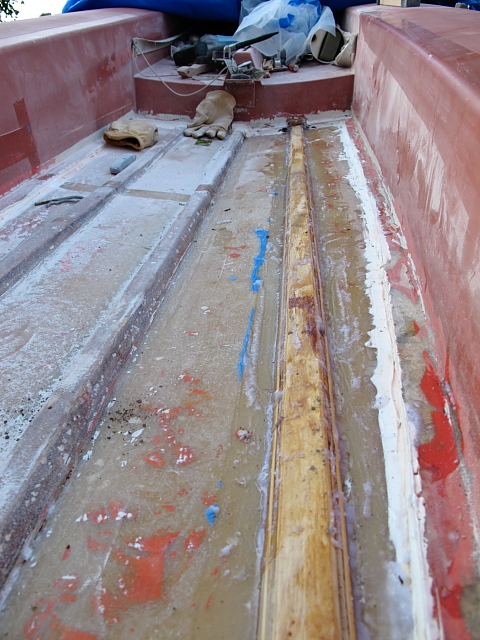
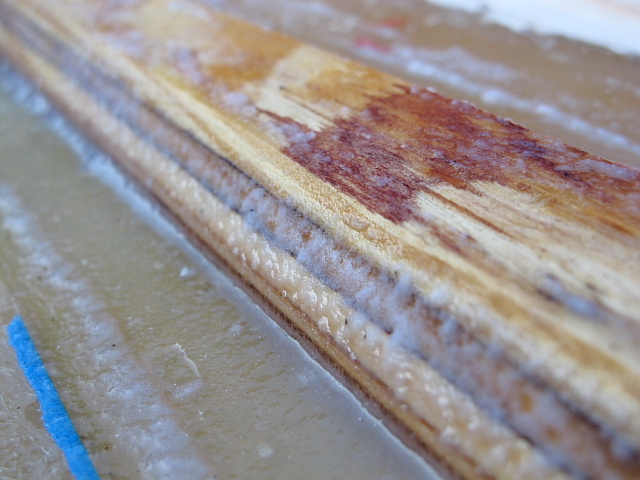
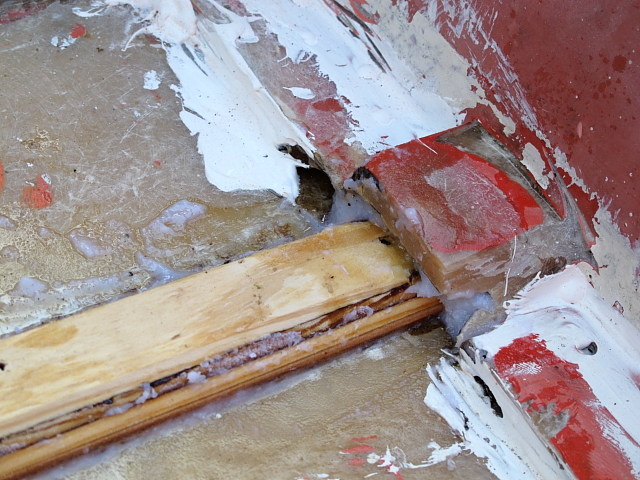
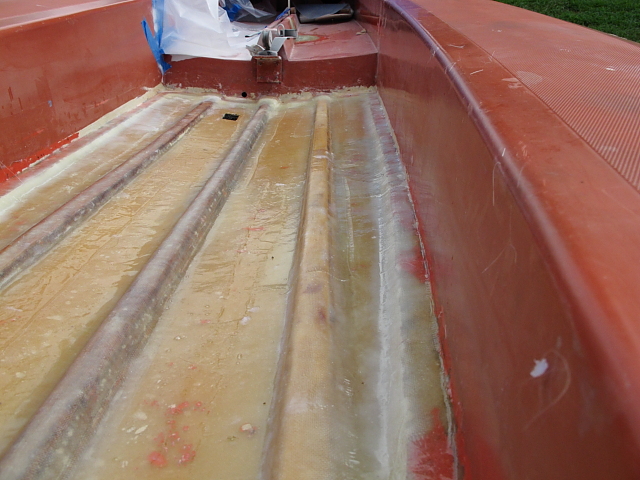
The wood I'm talking of are three strips that run lengthwise on the floor of the cockpit. They are embedded in fiberglass, but when looking through the rear drain hole, you can see the ends of the boards. I've looked at all the sidewinder pics I can find and no-one shows the deck floor. What are normal cockpit floors supposed to look like?
Here are some pics of my floor.
[www.sailmfg.com]
[www.sailmfg.com]
[www.sailmfg.com]
These cracks are only in the deck floor and the hull is in great shape. I've filled the hull with water, and only have small leaks at the rudder mounts and around the seam under the rub railing. These should be easy fixes compared to the floor.
I took some pics tonight and put them in "my files" but not sure what I can do with them. I've linked to some I've loaded in a facebook album on another post. But have not been able to embed them.
The wood I'm talking of are three strips that run lengthwise on the floor of the cockpit. They are embedded in fiberglass, but when looking through the rear drain hole, you can see the ends of the boards. I've looked at all the sidewinder pics I can find and no-one shows the deck floor. What are normal cockpit floors supposed to look like?
Here are some pics of my floor.
[www.sailmfg.com]
[www.sailmfg.com]
[www.sailmfg.com]
These cracks are only in the deck floor and the hull is in great shape. I've filled the hull with water, and only have small leaks at the rudder mounts and around the seam under the rub railing. These should be easy fixes compared to the floor.
|
Re: Sidewinder Rebuild May 08, 2010 04:28PM |
Registered: 13 years ago Posts: 78 |
Just an update......
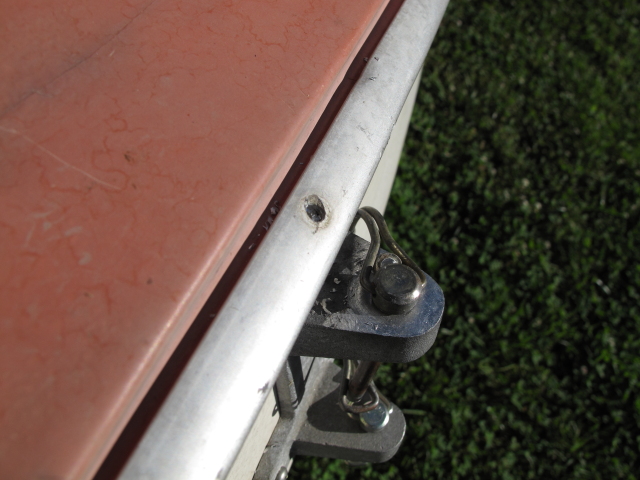
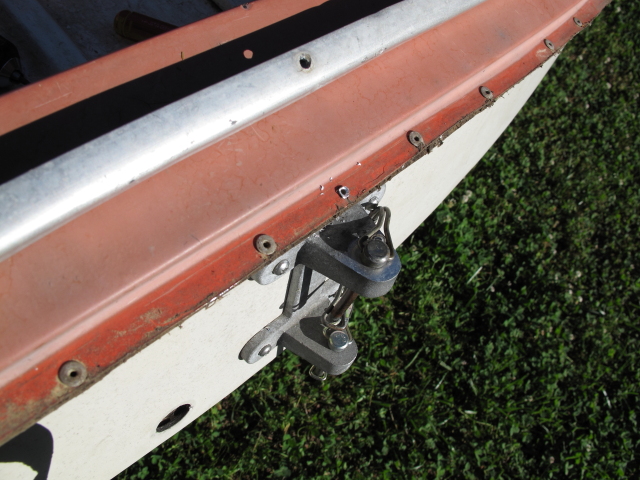
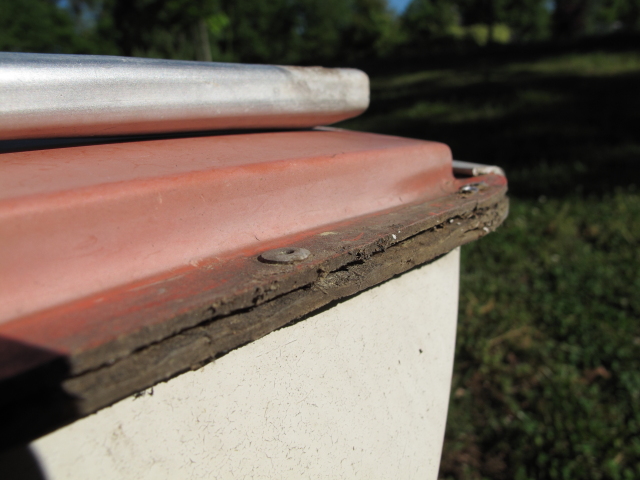
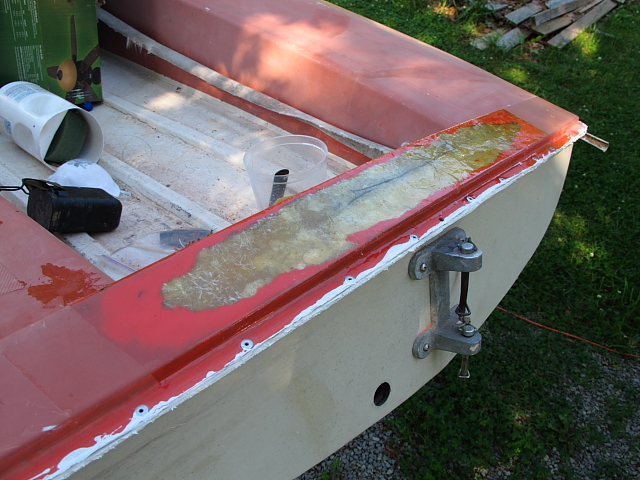
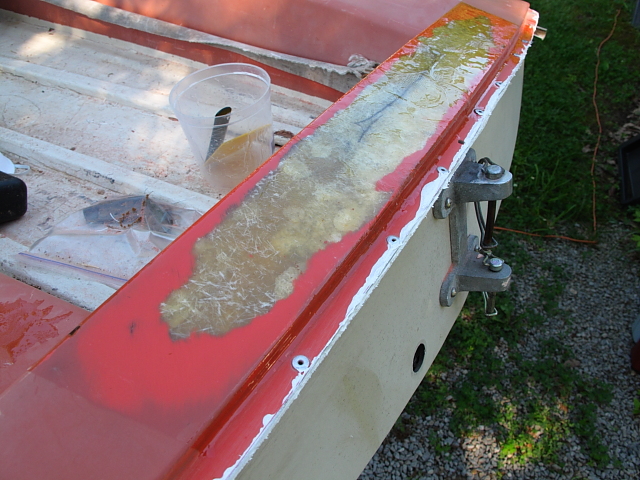
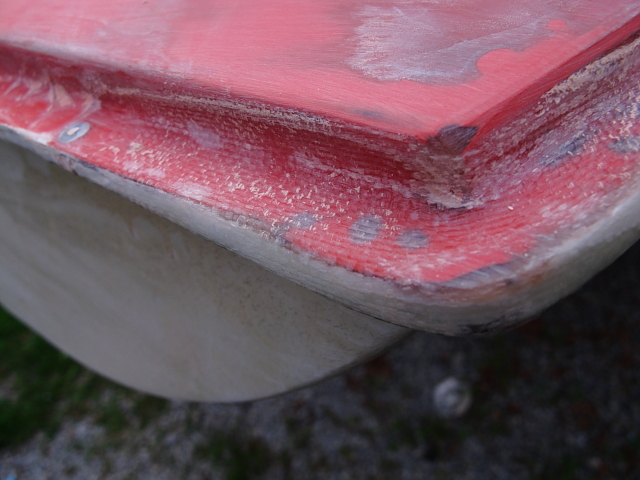
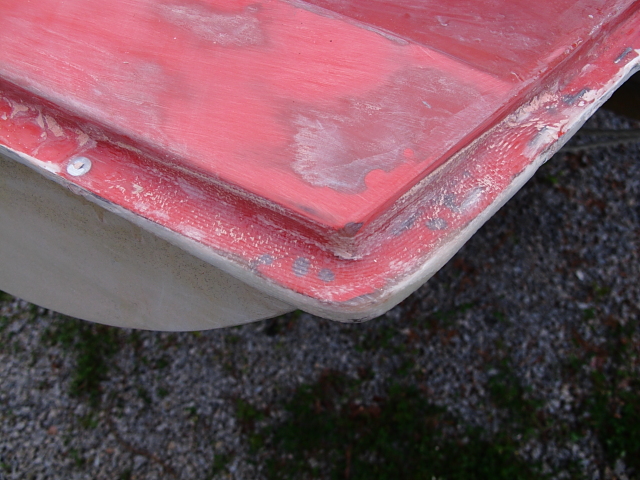
I had a few minutes this morning and removed the rear rub rail. I am fixing the leaks around the edges first since my work will be hidden with the rail. This should allow me to get comfortable with working with fiberglass before tackling the the visible repairs.
First I drilled out the center rivet and removed the rear corners. This was done with about an 1/8" bit. Don't go too big here, you just want to drill the center of the rivet to release the top of it. It's better to start small and work your way up. The top cap of the rivet will start to spin when your through. Once you remove the top carefully continue with the same bit to drill out the rest. Unless the pin is still in the rivet it should go pretty easily.
[www.sailmfg.com]
[www.sailmfg.com]
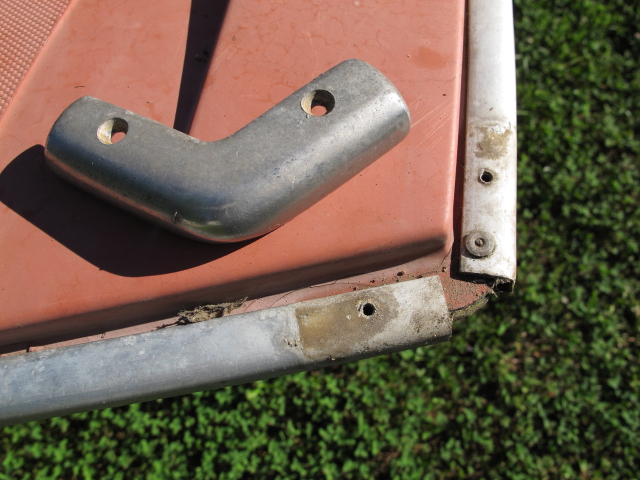
If I remembered how we cast aluminum in junior high I would make some of these corners and sell 'em. It sounds like a lot of people have broken or missing ones out there.
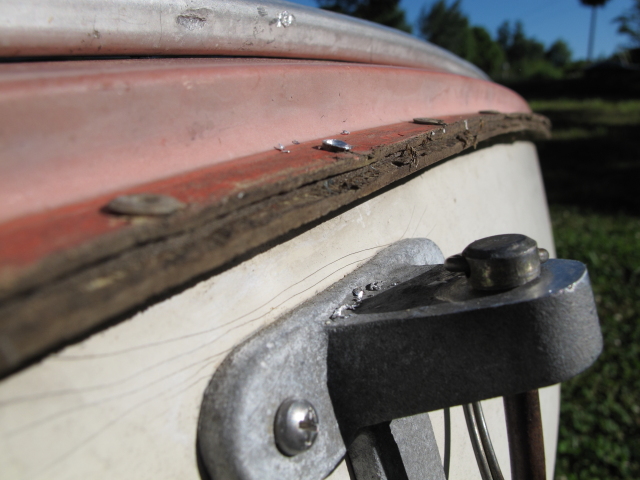
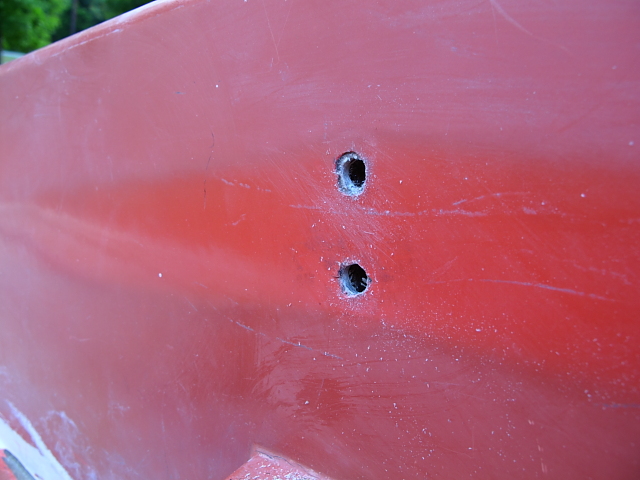
I then carefully pryed off the rear rail. My biggest leaks are at the corners. I wonder if some people mistakenly blame thier rudder bracket for the leaks when it's really this seam. When I flooded my hull and tipped the boat back I had alot of water coming from the corners and just a dribble from the bracket.
[www.sailmfg.com]
[www.sailmfg.com]
[www.sailmfg.com]
[www.sailmfg.com]
That's enough for this morning. I plan to drill out the rivets holding the deck on and sanding through the gelcoat to the glass and reglass the lip to seal the edge. I'll decide how far up the sides I will go with this process once I see how difficult and successful I am back here. I'll post more once I get some sanding started.
I had a few minutes this morning and removed the rear rub rail. I am fixing the leaks around the edges first since my work will be hidden with the rail. This should allow me to get comfortable with working with fiberglass before tackling the the visible repairs.
First I drilled out the center rivet and removed the rear corners. This was done with about an 1/8" bit. Don't go too big here, you just want to drill the center of the rivet to release the top of it. It's better to start small and work your way up. The top cap of the rivet will start to spin when your through. Once you remove the top carefully continue with the same bit to drill out the rest. Unless the pin is still in the rivet it should go pretty easily.
[www.sailmfg.com]
[www.sailmfg.com]
If I remembered how we cast aluminum in junior high I would make some of these corners and sell 'em. It sounds like a lot of people have broken or missing ones out there.
I then carefully pryed off the rear rail. My biggest leaks are at the corners. I wonder if some people mistakenly blame thier rudder bracket for the leaks when it's really this seam. When I flooded my hull and tipped the boat back I had alot of water coming from the corners and just a dribble from the bracket.
[www.sailmfg.com]
[www.sailmfg.com]
[www.sailmfg.com]
[www.sailmfg.com]
That's enough for this morning. I plan to drill out the rivets holding the deck on and sanding through the gelcoat to the glass and reglass the lip to seal the edge. I'll decide how far up the sides I will go with this process once I see how difficult and successful I am back here. I'll post more once I get some sanding started.
|
Re: Sidewinder Rebuild May 09, 2010 02:46AM |
Registered: 13 years ago Posts: 78 |
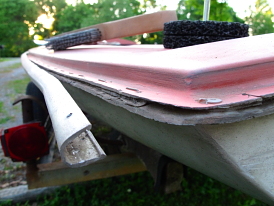
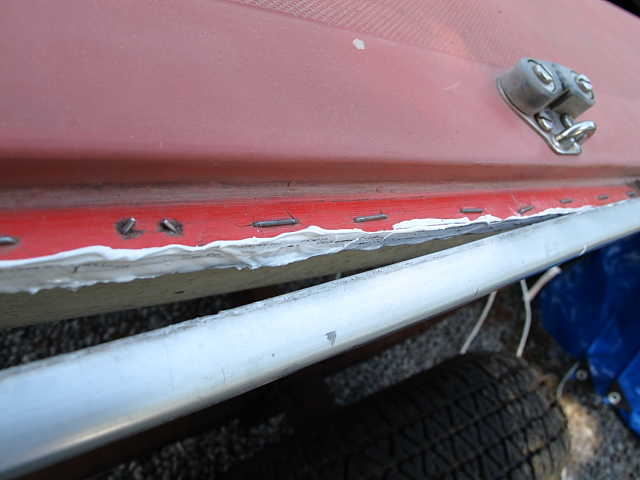
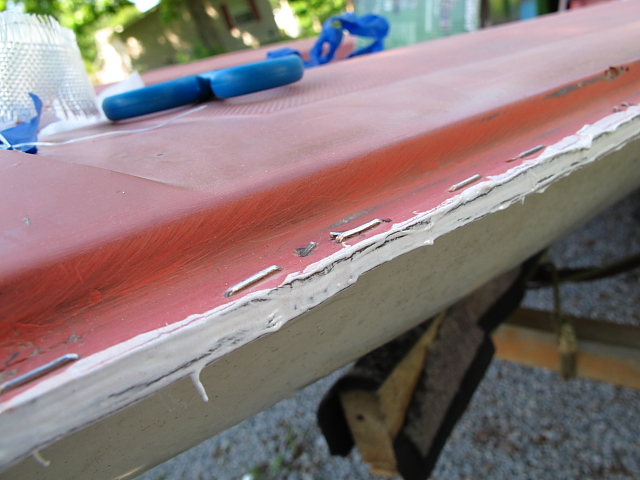
I had about 20 minutes to spare this evening so I decided to clean up the edge and release the side rails about 2-3' toward the front. As mentioned in an older post by someone, the sides are indeed stapled instead of riveted.
[www.sailmfg.com]
Take care not to damage the gelcoat as you pry the railing off. It doesn't just slide off, it needs to be spread apart so it clears the staples, top and bottom. I used a screw driver backed by a license plate to protect the deck. Take your time and work your way form the end an inch or so at a time.
[www.sailmfg.com]
[www.sailmfg.com]
Here I have both sides pulled out ready to be sanded and glassed
[www.sailmfg.com]
[www.sailmfg.com]
Take care not to damage the gelcoat as you pry the railing off. It doesn't just slide off, it needs to be spread apart so it clears the staples, top and bottom. I used a screw driver backed by a license plate to protect the deck. Take your time and work your way form the end an inch or so at a time.
[www.sailmfg.com]
[www.sailmfg.com]
Here I have both sides pulled out ready to be sanded and glassed
[www.sailmfg.com]
|
Re: Sidewinder Rebuild May 16, 2010 01:51AM |
Admin Registered: 18 years ago Posts: 187 |
|
Re: Sidewinder Rebuild May 19, 2010 03:06AM |
Registered: 13 years ago Posts: 78 |
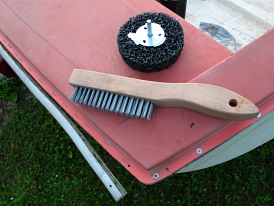
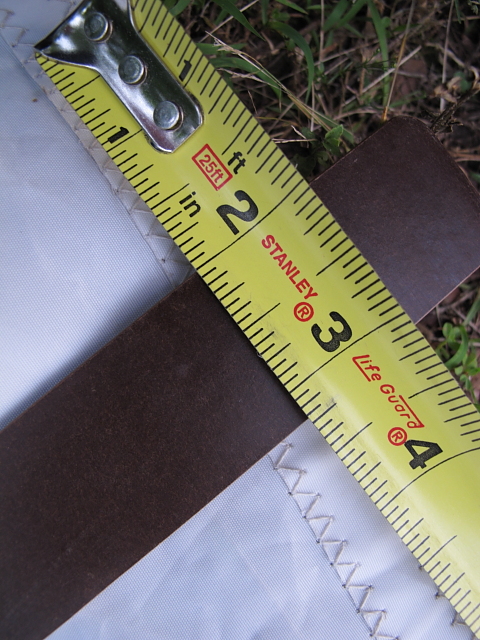
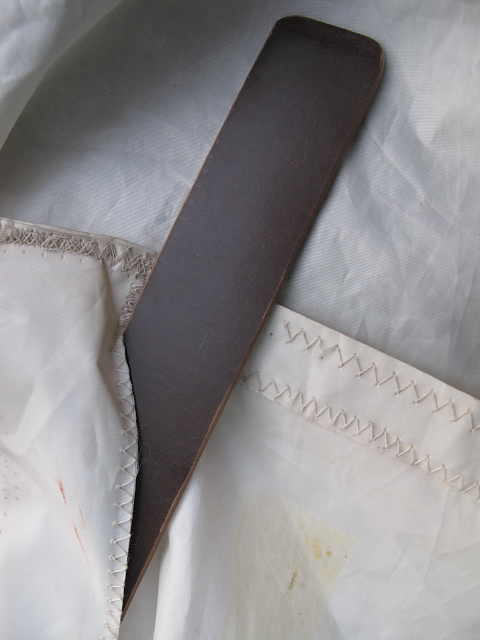
There have been a few questions concerning the battens of the mainsail. I pulled both my mainsails out and checked them. It looks like the original battens were made from a stiff fiberboard that is 1.25" wide with no taper. These battens have a curve to them that I assume is due to years of poor packing.
[www.sailmfg.com]
[www.sailmfg.com]
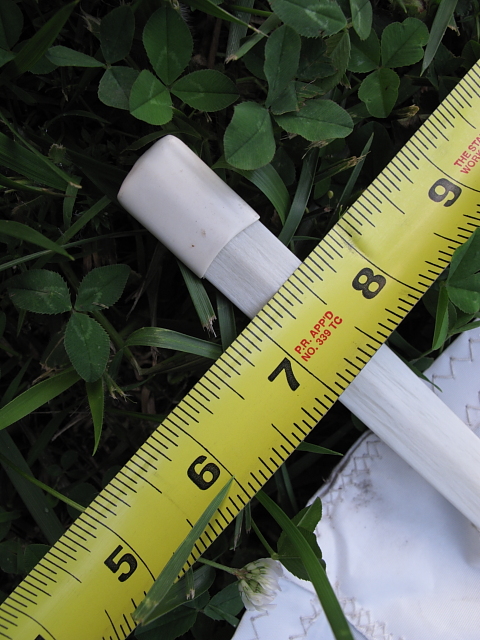
My better mainsail has two battens that are made from fiberglass with rubber/plastic tips. They are only 5/8" wide, with a taper that can been seen in the photos below.
[www.sailmfg.com]
[www.sailmfg.com]
Joe
Sidewinder #327
[www.sailmfg.com]
[www.sailmfg.com]
My better mainsail has two battens that are made from fiberglass with rubber/plastic tips. They are only 5/8" wide, with a taper that can been seen in the photos below.
[www.sailmfg.com]
[www.sailmfg.com]
Joe
Sidewinder #327
|
Re: Sidewinder Rebuild May 23, 2010 12:35AM |
Registered: 13 years ago Posts: 78 |
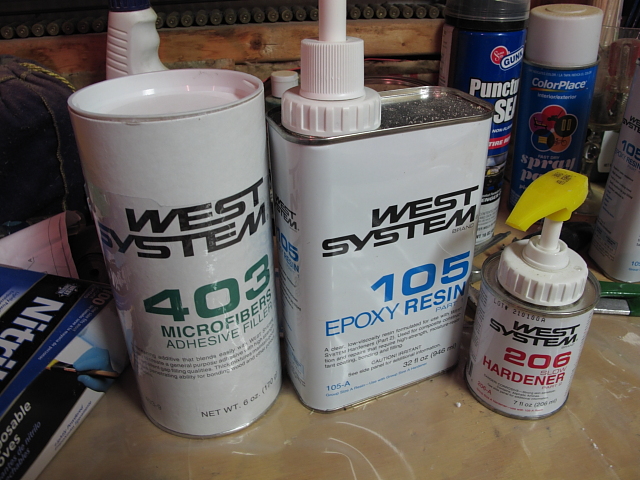
I finally had some time to work on my boat today. Sadly most of this morning was spent trying to locate a fiberglass supplier here in Nashville Tn. The fiberglass I got was from West Systems, an epoxy resin with 205 slow hardener. They have a slick metering/pump system that worked good the first time I needed it, I'll let you know if it still works later.
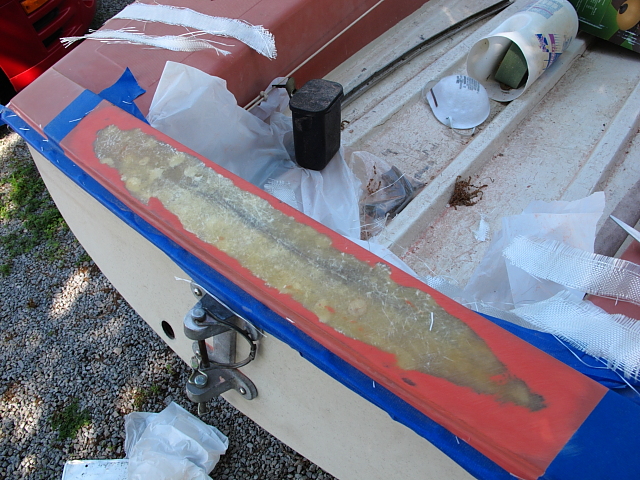
I also picked up some 5200 adhesive to help seal around the edge. After deciding to remove the rail to about half the length of the boat, I ran a bead down one side, across the back, and up the other side. I chose to pull the railing farther forward just to be safe. Here are some pictures of the sealant/adhesive...
[www.sailmfg.com]
[www.sailmfg.com]
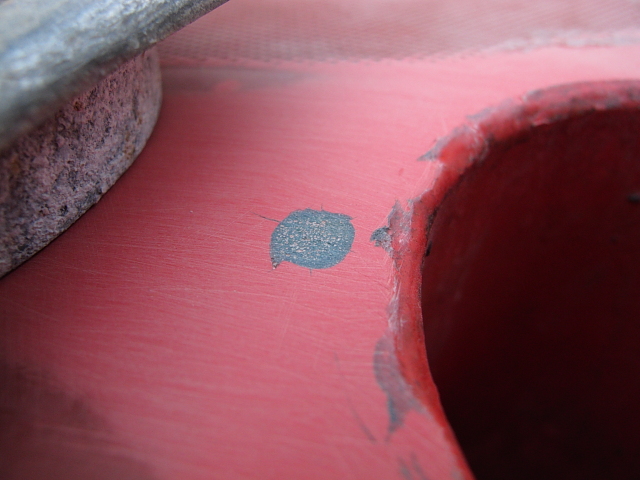
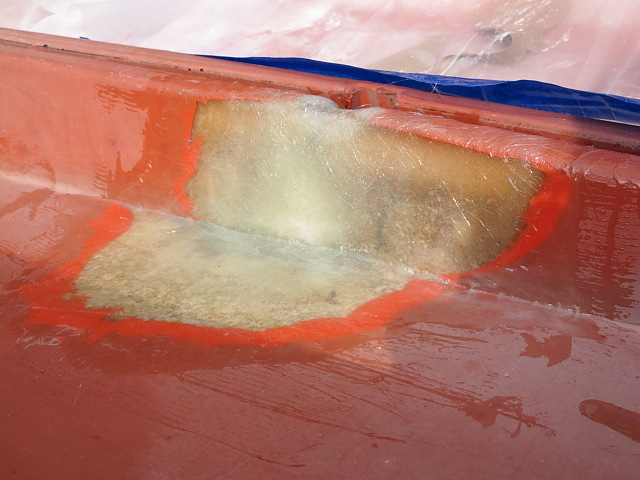
Since this has to dry for about 6 hours before fiberglass can be put over it, I decided to take care of the top rear deck. This had a crack, but wasn't soft. Water also came from here during my hull flood test. I used a 4" plastic fiber sanding disc to sand through the gel coat to the crack. I have a picture of it in a previous post on this thread. I powered it with a 1/2" dewalt drill, and it worked great. Not too fast or too slow. Here are pictures of the deck after sanding.
[www.sailmfg.com]
[www.sailmfg.com]
You can see where blisters had formed from air not being removed during manufacture I guess. They show up as light colored spots that are real obvious when you sand through them.
One thing I did find out today is that your probably better off buying your resin and hardener online. You may save some money compared to your local store. Here is one link I found...[www.fiberglasssupply.com] I haven't used them, but they seem a bit cheaper. Good information there also. Home Depot sells acetone for 1/2 the price of our local marine store.
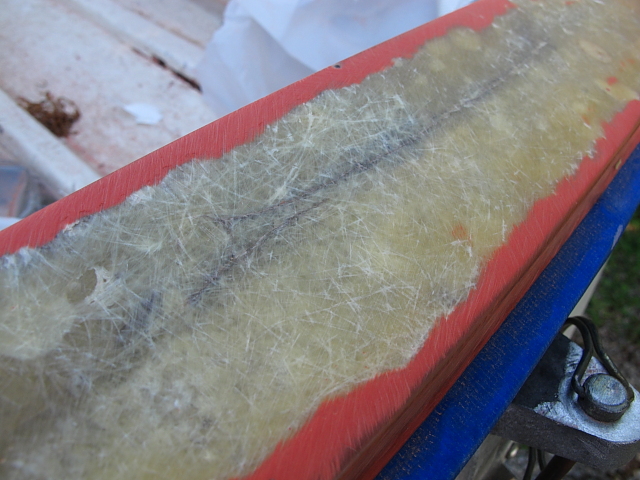
Here are some pictures of my first attempt at fiberglassing.
[www.sailmfg.com]
[www.sailmfg.com]
I used two pieces of cloth about 1 1/2" by 10". Using the pump system from West Systems you should only need about 3 pumps of resin and hardener for this back section, about 20"x4". Unfortunately I used too much and wasted some. I plan to sand this smooth and put one more large piece over it.
I did realize one other thing today....I'd much rather be sailing then fiberglassing. It's supposed to be nice tomorrow, so once the honeydo's are over I will be back at it again.
Joe
Sidewinder #327
Edited 1 time(s). Last edit at 05/23/2010 12:46AM by Joe.
I also picked up some 5200 adhesive to help seal around the edge. After deciding to remove the rail to about half the length of the boat, I ran a bead down one side, across the back, and up the other side. I chose to pull the railing farther forward just to be safe. Here are some pictures of the sealant/adhesive...
[www.sailmfg.com]
[www.sailmfg.com]
Since this has to dry for about 6 hours before fiberglass can be put over it, I decided to take care of the top rear deck. This had a crack, but wasn't soft. Water also came from here during my hull flood test. I used a 4" plastic fiber sanding disc to sand through the gel coat to the crack. I have a picture of it in a previous post on this thread. I powered it with a 1/2" dewalt drill, and it worked great. Not too fast or too slow. Here are pictures of the deck after sanding.
[www.sailmfg.com]
[www.sailmfg.com]
You can see where blisters had formed from air not being removed during manufacture I guess. They show up as light colored spots that are real obvious when you sand through them.
One thing I did find out today is that your probably better off buying your resin and hardener online. You may save some money compared to your local store. Here is one link I found...[www.fiberglasssupply.com] I haven't used them, but they seem a bit cheaper. Good information there also. Home Depot sells acetone for 1/2 the price of our local marine store.
Here are some pictures of my first attempt at fiberglassing.
[www.sailmfg.com]
[www.sailmfg.com]
I used two pieces of cloth about 1 1/2" by 10". Using the pump system from West Systems you should only need about 3 pumps of resin and hardener for this back section, about 20"x4". Unfortunately I used too much and wasted some. I plan to sand this smooth and put one more large piece over it.
I did realize one other thing today....I'd much rather be sailing then fiberglassing. It's supposed to be nice tomorrow, so once the honeydo's are over I will be back at it again.
Joe
Sidewinder #327
Edited 1 time(s). Last edit at 05/23/2010 12:46AM by Joe.
|
Re: Sidewinder Rebuild May 28, 2010 04:06AM |
Registered: 13 years ago Posts: 78 |
I finally had a chance to do some work between honeydo's and overtime at work. I decided to work on the corners that turned out to be a bit of a hassle. After cutting 4 pieces of cloth 2"x5", 2 for each corner, I mixed up some resin. It took a bit of work getting it to lay down around the small radius of the lip and around the corners. It may not be pretty but it should slow up the bleeding(leaking) that I had before. Just to remind you I will post some before and after pics.
Left side
Before:
[www.sailmfg.com]
After:
[www.sailmfg.com]
[www.sailmfg.com]
Right side
Before:
[www.sailmfg.com]
After:
[www.sailmfg.com]
[www.sailmfg.com]
I still plan to drill out the rivets across back and wrap the edge just like the corners. It looks like a nice long weekend ahead, so I'll post more later.
Joe
Sidewinder #327
Edited 1 time(s). Last edit at 05/28/2010 04:53AM by Joe.
|
Re: Sidewinder Rebuild May 28, 2010 02:39PM |
Registered: 13 years ago Posts: 6 |
|
Re: Sidewinder Rebuild May 31, 2010 08:58PM |
Registered: 13 years ago Posts: 78 |
First off let me take this time to thank our Veterans out there for all that you've done and sacrificed for our country.
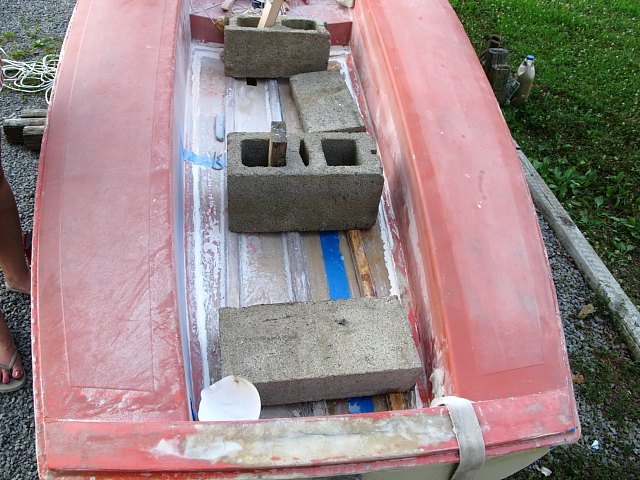
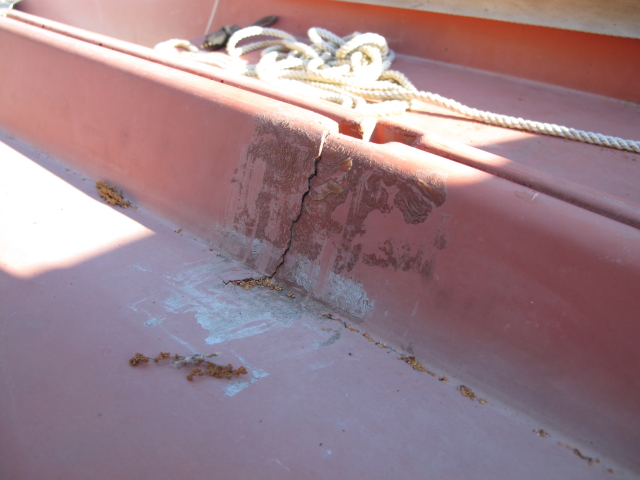
Well, I took a pretty big bite out of my elephant today. The manufacturing process of these little boats also became more clear to me. My pictures may help answer some questions for others out there too. I decided to tackle the floor of my boat since this is another area of concern when it comes to the bleeding.(Remember...leaking) After unsuccessfully trying to remove the paint that someone put in the cockpit with my bristle brush disc, I broke out my brand new 4 1/2"grinder with a sanding disc on it. Am I glad I got this thing, work progresses so much faster. So much so, you havev to be careful not to cut through things you don't mean to.
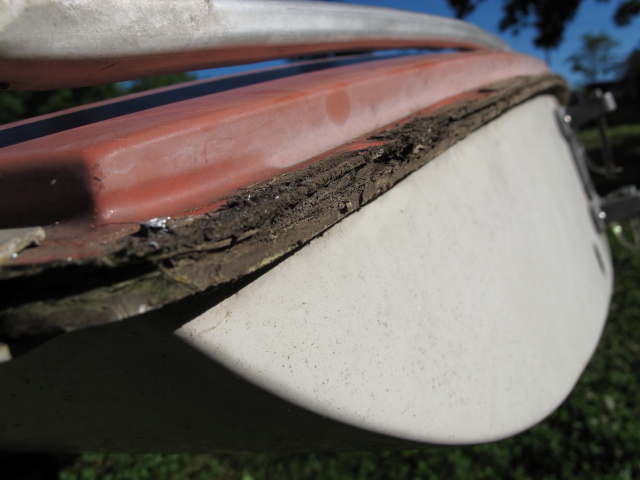
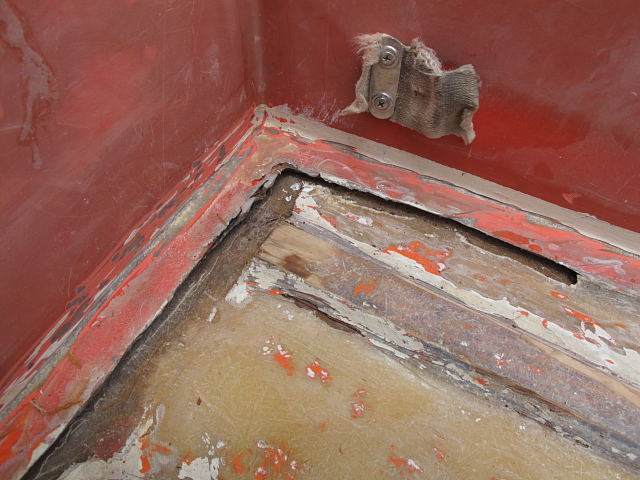
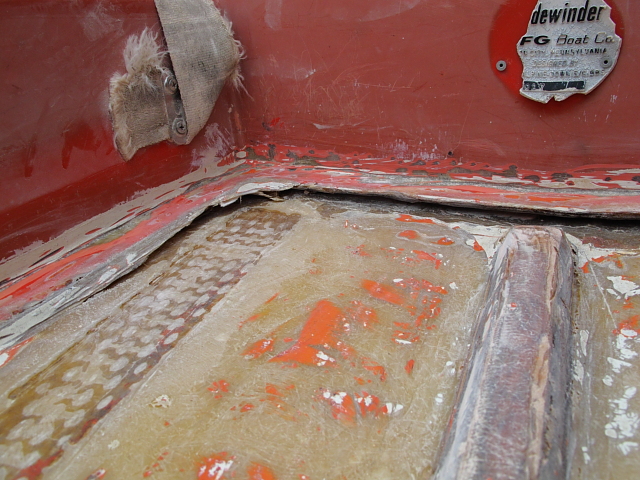
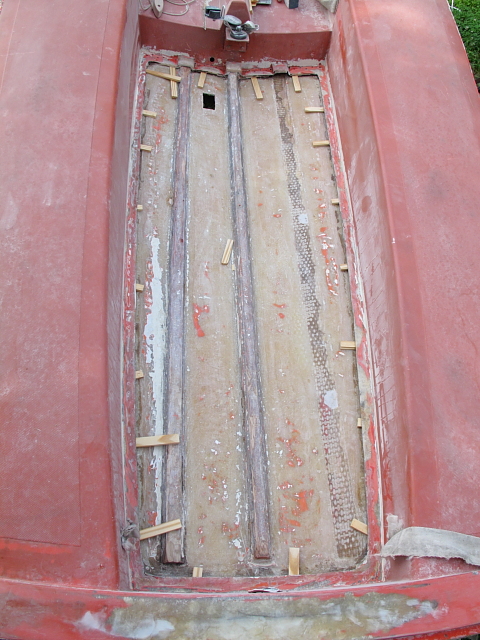
The floor of my sidewinder is actually the inside of the hull. It had 3 stringers run lengthwise that were fiberglassed to the hull. The top deck isn't really supported by the hull. You can see it in this photo.
[www.sailmfg.com]
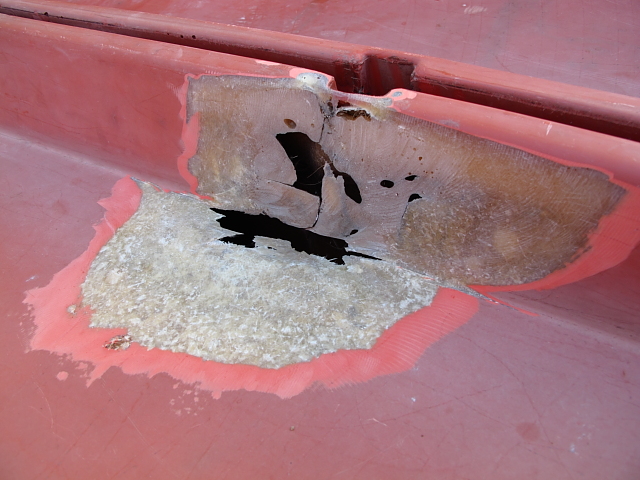
I've cut out the fiberglass that attached the deck to the hull. There was no wood between them, just a gap. The layer of fiberglass wasn't very thick connecting the hull to the deck either. Since this seems like it would be a stress area, I'm still deciding how to remedy this, 5200 sealant, thickened epoxy, or just multiple layers of heavy weight cloth.
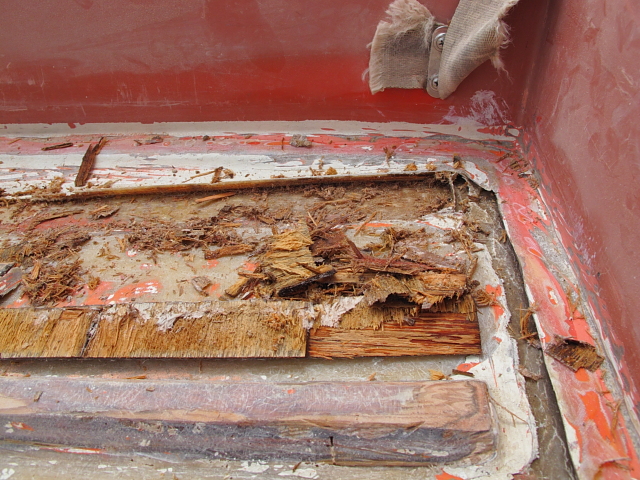
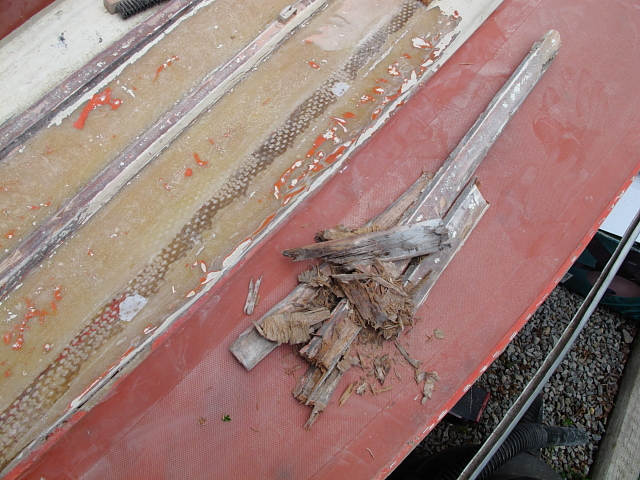
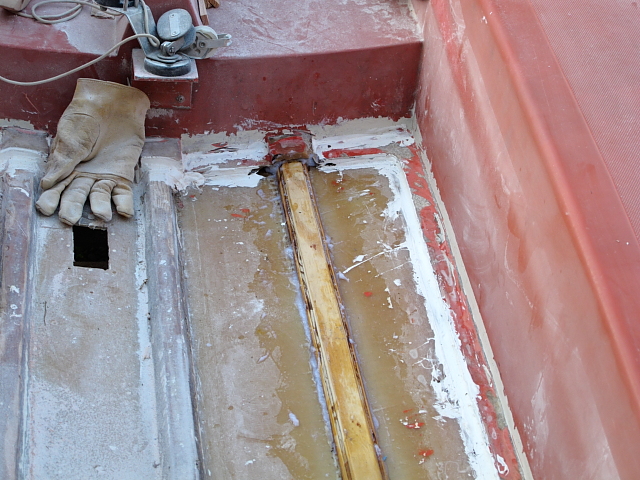
While cleaning up the floor, it became apparent that some if not all of the stringers will have to come out. I've removed most of one of them, here are the photos.
[www.sailmfg.com]
[www.sailmfg.com]
[www.sailmfg.com]
[www.sailmfg.com]
You can see from the last photo that once the stringer is out of there, it's not as scarey looking. It's not worth trying to piece a stringer together, or put a patch over it. It's easier to remove the whole thing and start from scratch. It was obvious after removing and cleaning up the area that the stringer wasn't bonded to the hull very well either, which allowed water to seep from the front of the hull near the centerboard. This water could not run out from under them, so it just rotted them out. Once I remove the front section of the stringer, I'll figure a way to seal this up. This is what is leading me to use the 5200, followed up by glass around the whole perimeter.
That's enough for today, maybe I'll be hungry for more elephant tomorrow. Everyone enjoy thier holiday weekend.
Joe
Sidewinder #327
Well, I took a pretty big bite out of my elephant today. The manufacturing process of these little boats also became more clear to me. My pictures may help answer some questions for others out there too. I decided to tackle the floor of my boat since this is another area of concern when it comes to the bleeding.(Remember...leaking) After unsuccessfully trying to remove the paint that someone put in the cockpit with my bristle brush disc, I broke out my brand new 4 1/2"grinder with a sanding disc on it. Am I glad I got this thing, work progresses so much faster. So much so, you havev to be careful not to cut through things you don't mean to.
The floor of my sidewinder is actually the inside of the hull. It had 3 stringers run lengthwise that were fiberglassed to the hull. The top deck isn't really supported by the hull. You can see it in this photo.
[www.sailmfg.com]
I've cut out the fiberglass that attached the deck to the hull. There was no wood between them, just a gap. The layer of fiberglass wasn't very thick connecting the hull to the deck either. Since this seems like it would be a stress area, I'm still deciding how to remedy this, 5200 sealant, thickened epoxy, or just multiple layers of heavy weight cloth.
While cleaning up the floor, it became apparent that some if not all of the stringers will have to come out. I've removed most of one of them, here are the photos.
[www.sailmfg.com]
[www.sailmfg.com]
[www.sailmfg.com]
[www.sailmfg.com]
You can see from the last photo that once the stringer is out of there, it's not as scarey looking. It's not worth trying to piece a stringer together, or put a patch over it. It's easier to remove the whole thing and start from scratch. It was obvious after removing and cleaning up the area that the stringer wasn't bonded to the hull very well either, which allowed water to seep from the front of the hull near the centerboard. This water could not run out from under them, so it just rotted them out. Once I remove the front section of the stringer, I'll figure a way to seal this up. This is what is leading me to use the 5200, followed up by glass around the whole perimeter.
That's enough for today, maybe I'll be hungry for more elephant tomorrow. Everyone enjoy thier holiday weekend.
Joe
Sidewinder #327
|
Re: Sidewinder Rebuild June 02, 2010 12:44AM |
Registered: 13 years ago Posts: 6 |
After looking at your floor rebuild, I've decided to finish the hull of mine and never turn it over to do the rest. I've been lucky so far and have a boat with more intact than not. This is kind of a first for me, dealing with a project that isn't so far gone already that I wonder why I started on it. I'm just about ready to put start putting fiberglass on the hull. Looking for advise on what weight cloth to go with. I'm guessing 4 oz, but I'm not sure. Any suggestions?
|
Re: Sidewinder Rebuild June 05, 2010 04:13AM |
Registered: 13 years ago Posts: 78 |
I don't think my repair of the floor will be too bad. Once I get the garbage out of there, it should go pretty quick and definately be better than what I currently have.
I can't give you much advise on what cloth to use to lay up on your hull, but I wouldn't think you would need much as far as weight goes since your hull still has it's structural integrity.
I did follow your lead on removing the entire rail on both sides. Good thing too, there was some damage hidden about two thirds of the way up on the rt side. Not really a structural problem, but a definate area for water to get in.
Joe
Sidewinder #327
|
Re: Sidewinder Rebuild June 07, 2010 01:51AM |
Registered: 13 years ago Posts: 78 |
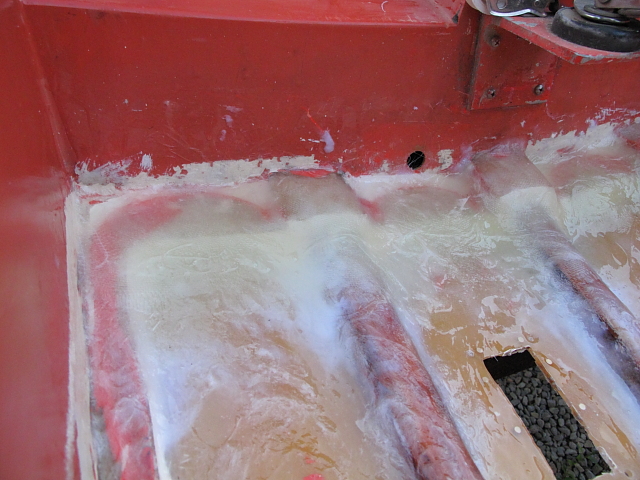
Another quick update of my work.
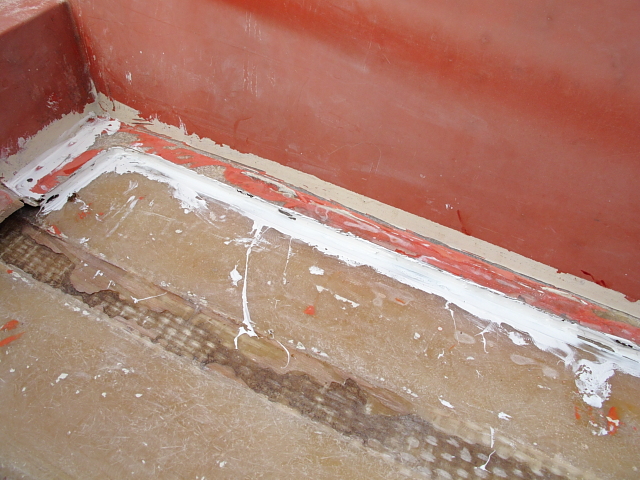
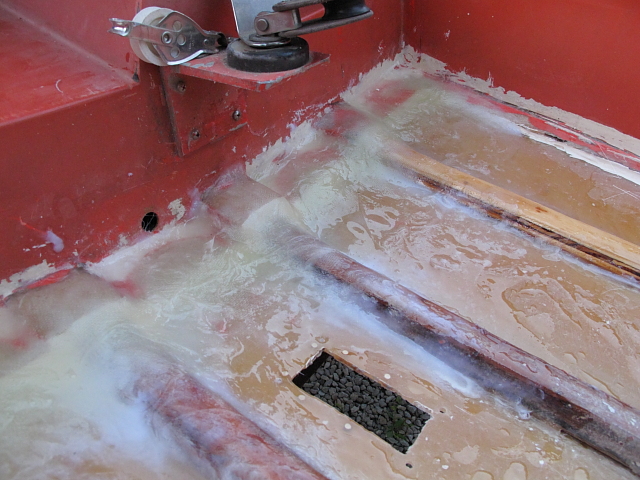
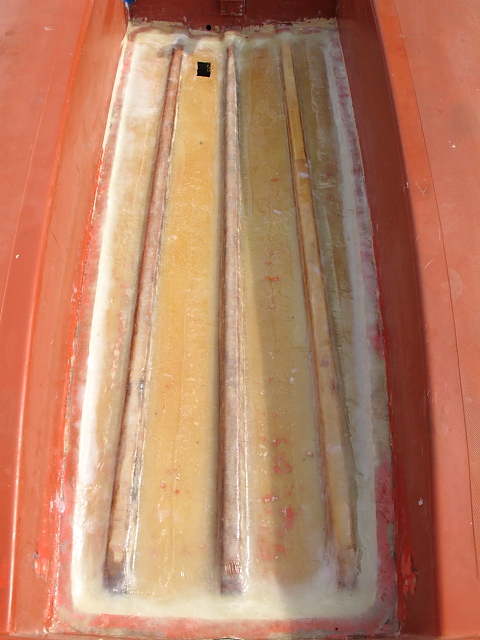
Most of the floor has been cleaned up and ready to to be sealed and glassed. Here are some before and after pics....
Before....
[www.sailmfg.com]
[www.sailmfg.com]
[www.sailmfg.com]
After....
[www.sailmfg.com]
[www.sailmfg.com]
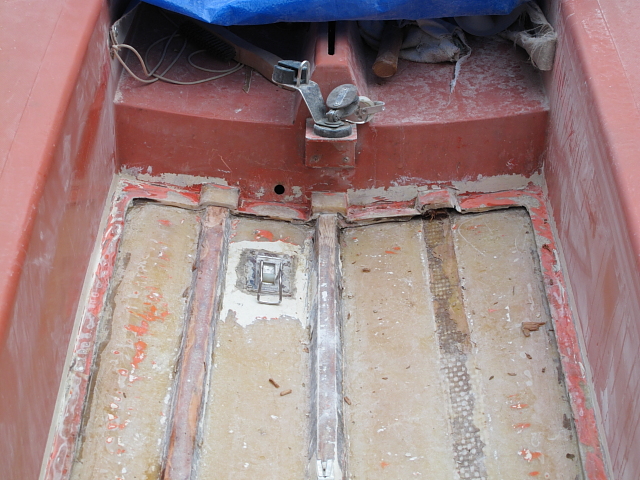
The next picture shows a stringer I removed. I didn't realize it went so far up under the deck but I was able clean it out about 1.5" under the deck. This will be filled with thickened epoxy before the new stringer is put in.
[www.sailmfg.com]
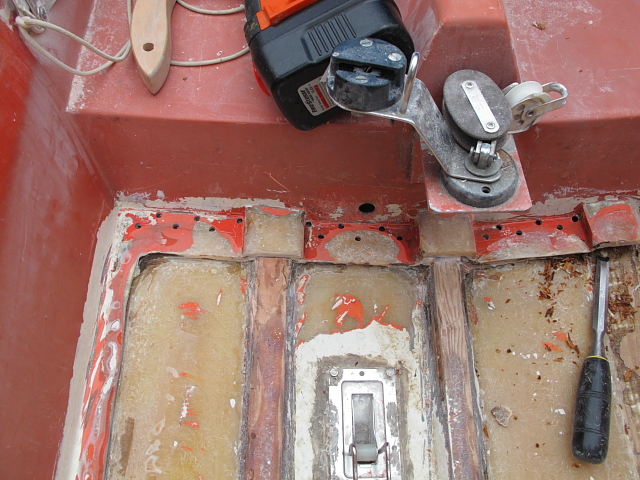
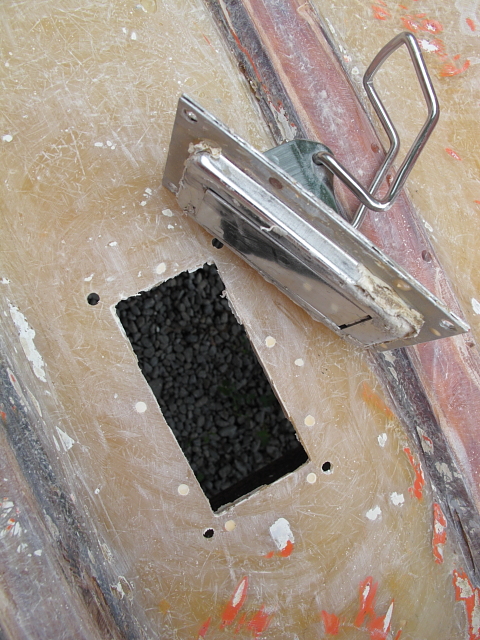
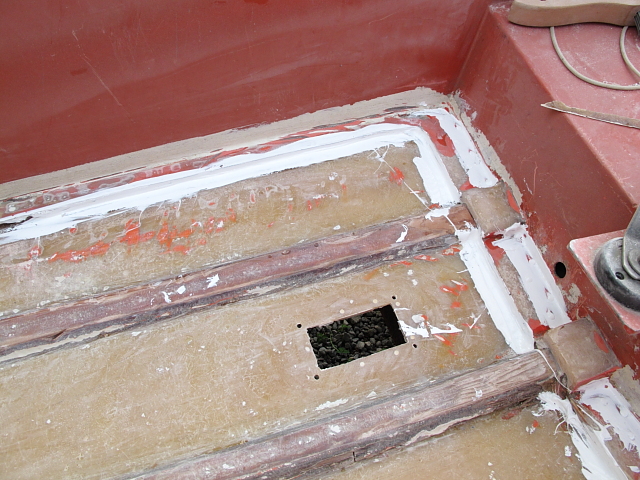
Holes were then drilled along the front to help seal this area. Wedges will be used to spread the deck and hull before 5200 is squirted into holes and around the edges. These will be pulled out, allowing the two halves to return, squeezing the sealant into any voids. Once allowed to dry completely, fillets will be made with thickened epoxy before any cloth and resin are applied.
[www.sailmfg.com]
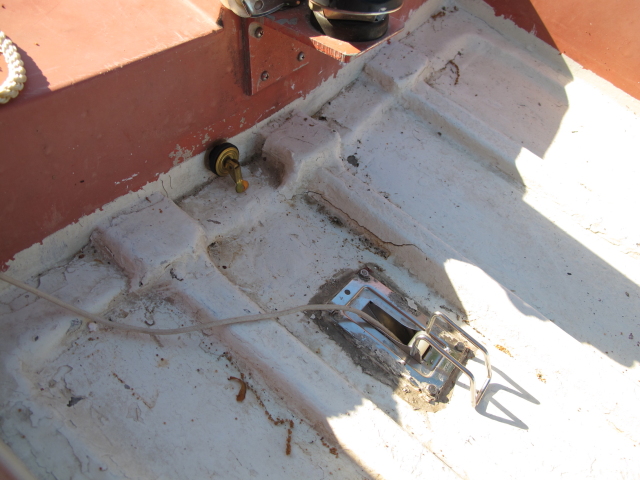
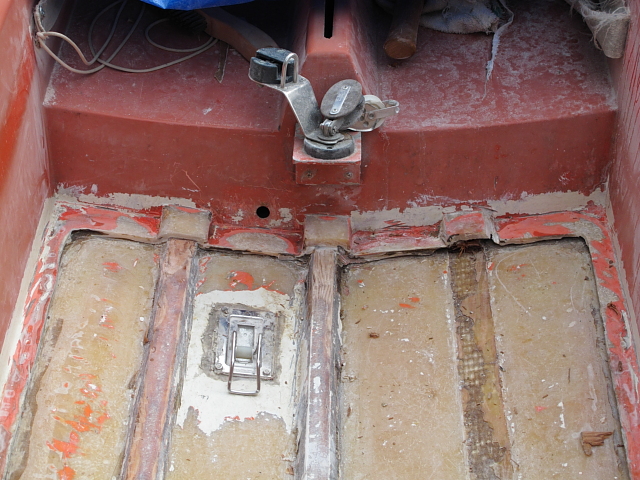
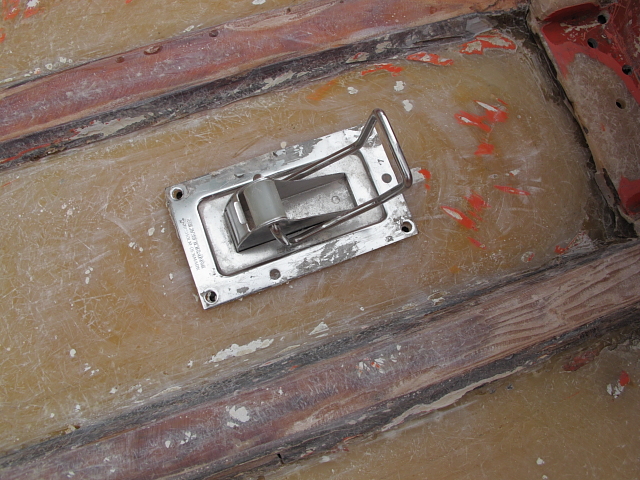
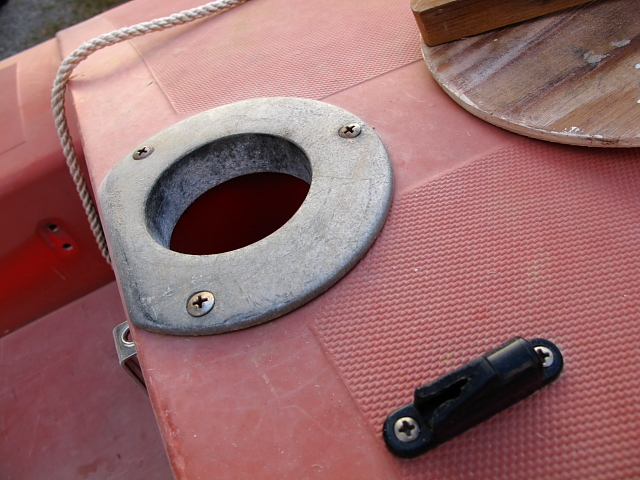
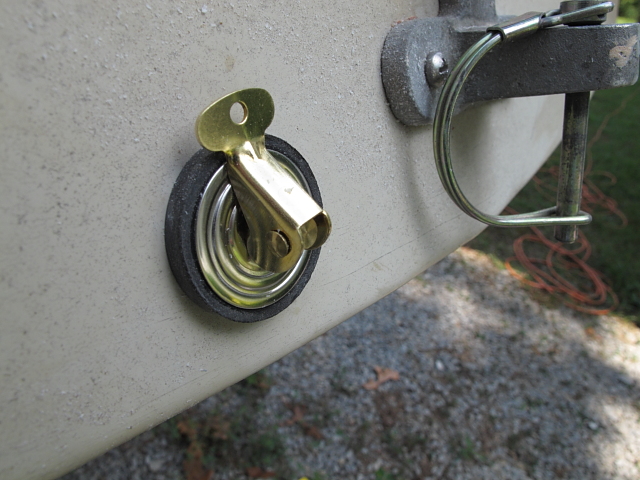
Here are some pictures of the self bailer if anyone is interested.
[www.sailmfg.com]
[www.sailmfg.com]
Sorry I'm not a fast worker with this project, but I do hope some of these photos and descriptions might give someone some insight into future projects of their own. Most of these techniques can be used for any MFG boat, and that's what this site is for. The reconditioning and enjoyment of these wonderful boats. Personally I'm ready to start enjoying.
If anyone out there could send me pictures of what a factory cockpit floor looks like, I would really appreciate it. You can PM me for my email address, or just post them to this thread.
I'd also appreciate any feedback on what you think of this thread and the information I'm providing.
Joe
Sidewinder #327
Edited 1 time(s). Last edit at 06/16/2010 05:07AM by Joe.
Most of the floor has been cleaned up and ready to to be sealed and glassed. Here are some before and after pics....
Before....
[www.sailmfg.com]
[www.sailmfg.com]
[www.sailmfg.com]
After....
[www.sailmfg.com]
[www.sailmfg.com]
The next picture shows a stringer I removed. I didn't realize it went so far up under the deck but I was able clean it out about 1.5" under the deck. This will be filled with thickened epoxy before the new stringer is put in.
[www.sailmfg.com]
Holes were then drilled along the front to help seal this area. Wedges will be used to spread the deck and hull before 5200 is squirted into holes and around the edges. These will be pulled out, allowing the two halves to return, squeezing the sealant into any voids. Once allowed to dry completely, fillets will be made with thickened epoxy before any cloth and resin are applied.
[www.sailmfg.com]
Here are some pictures of the self bailer if anyone is interested.
[www.sailmfg.com]
[www.sailmfg.com]
Sorry I'm not a fast worker with this project, but I do hope some of these photos and descriptions might give someone some insight into future projects of their own. Most of these techniques can be used for any MFG boat, and that's what this site is for. The reconditioning and enjoyment of these wonderful boats. Personally I'm ready to start enjoying.
If anyone out there could send me pictures of what a factory cockpit floor looks like, I would really appreciate it. You can PM me for my email address, or just post them to this thread.
I'd also appreciate any feedback on what you think of this thread and the information I'm providing.
Joe
Sidewinder #327
Edited 1 time(s). Last edit at 06/16/2010 05:07AM by Joe.
|
Re: Sidewinder Rebuild June 09, 2010 04:21AM |
Registered: 13 years ago Posts: 78 |
Had a chance to put my theories to work this evening. It went ok for the most part. After putting the shims between the hull and deck, sealant was squirted in the gap. When I removed the shims, the deck didn't seem to squeeze out as much sealant as I'd hoped. Unfortunately one tube was nowhere near enough, but the tube that was put in has cured up well and seems to have created a good bond between the two. Looks like rain tomorrow, but I hope to get the rest of the sealant in place, including the entire edge under the rub rail.
I never thought I'd look forward to fiberglassing, but this part is getting old fast.
Some photos to show the progress.....
[www.sailmfg.com]
[www.sailmfg.com]
[www.sailmfg.com]
[www.sailmfg.com]
BTW Drilling the holes and injecting the sealant through them seemed to work pretty well. I kept squirting it in a hole until you could just start seeing it in an adjacent hole. This same method should work well with thickened epoxy. West Systems sells syringes just for this procedure.
Joe
Sidewinder #327
|
Re: Sidewinder Rebuild June 12, 2010 05:13PM |
Registered: 13 years ago Posts: 78 |
Well it's been a couple of days for the sealant to cure, and I can officially say, "I feel sorry for the next guy to get this boat." Especially if he has intentions of splitting the top from the bottom. Because they are well on their way to becoming one piece. I'm still not sure this was the initial design, but it's what I'm going with. One moment I think someone may have cut out the floor and discarded it. But then I look at the self bailer, and see that it's not very thick, certianly not thick enough to go through the hull and a floor.
My next venture is putting the missing stringer in and fiberglassing the whole floor. I can see an end to this tunnel!!!!!
Joe
Sidewinder #327
My next venture is putting the missing stringer in and fiberglassing the whole floor. I can see an end to this tunnel!!!!!
Joe
Sidewinder #327
|
Re: Sidewinder Rebuild June 13, 2010 09:52PM |
Registered: 13 years ago Posts: 78 |
Finally got the side seams all fiberglassed up. I used the same method as along the back of the boat. I did doudle up the cloth near the hoops for the stays. Not sure if this really helps, but it makes me think I've made it stronger. All that's left here is to clean the edges up a bit before painting and reinstalling the rub rail. Now comes the task of finishing up the floor. I've never mixed filler with resin before, we'll see how that turns out. Something tells me this is going to use alot of resin, which equals $$$$.
Joe
Sidewinder #327
Joe
Sidewinder #327
|
Re: Sidewinder Rebuild June 16, 2010 04:35AM |
Registered: 13 years ago Posts: 78 |
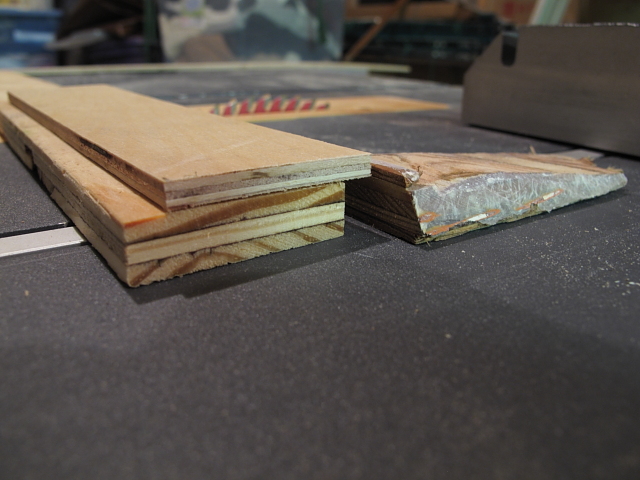
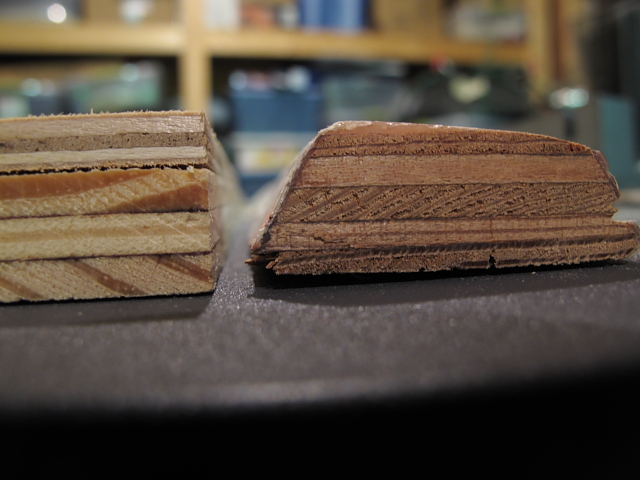
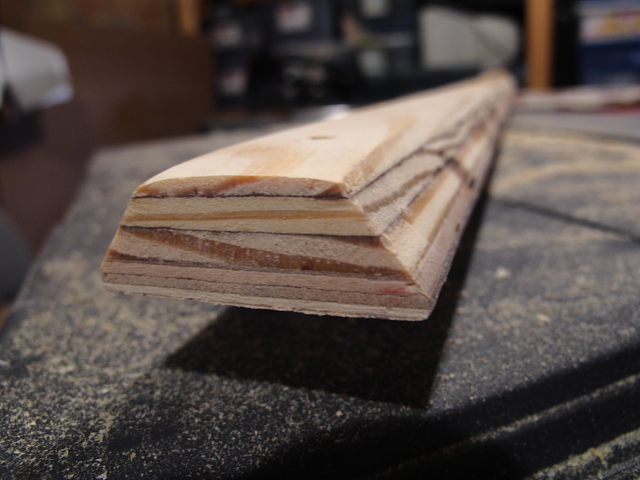
Finally I'm at the point of making a replacement stringer. I considered using 3/4 plywood or 1" hardwood as a replacement. The stringer size is 64x2 and buying a whole 4x8 sheet of plywood seemed a bit much. The 1" hardwood seemed to be way too stiff. I could've used the 1" and sanded it to match the bottom contour.
Instead I decided to use what I had on hand. 48x48 inch 1/2 plywood and some 1/4" plywood. When added together they are slightly thicker than the original stringer.
[www.sailmfg.com]
[www.sailmfg.com]
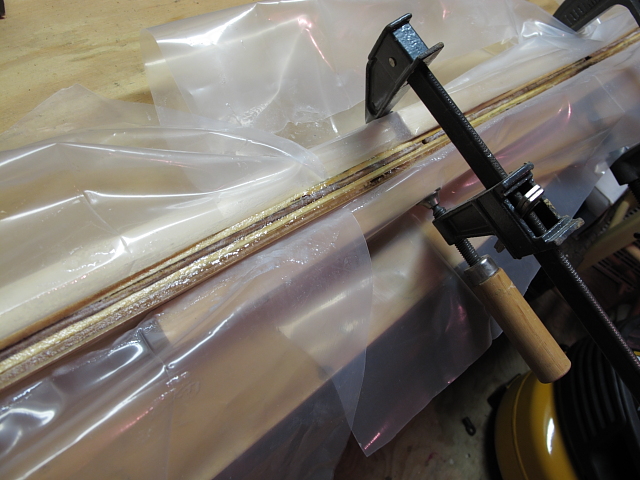
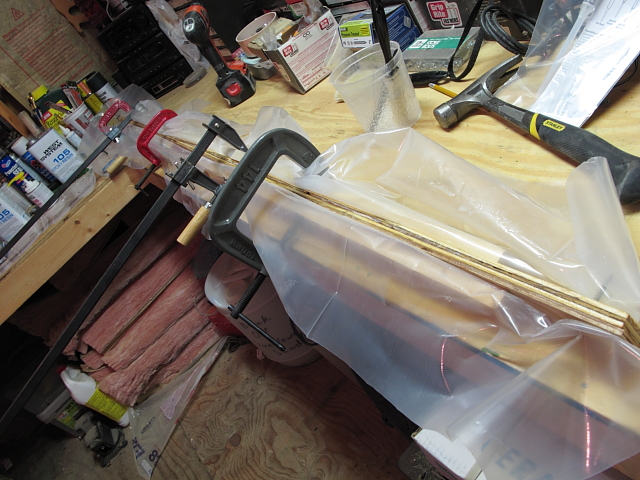
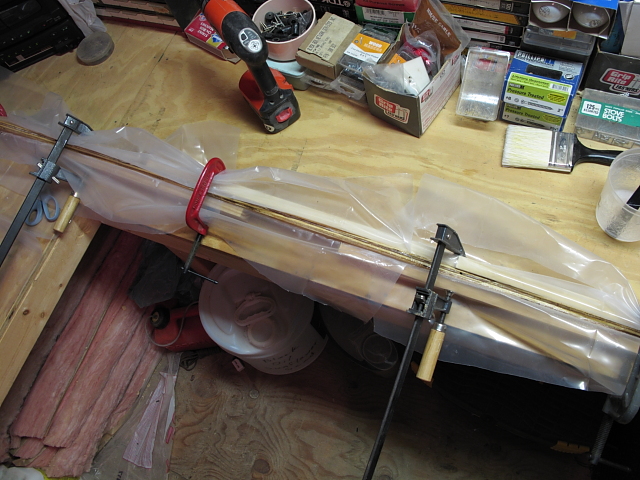
Since the plywood I had was too short I tried my hand at scarfing two pieces together. When I laminated the 1/4" pieces to the 1/2" pieces I staggered the scarf to prevent weakness. Ideally you want a longer scarf, but thats the greatest angle I can make on my table saw. Here is a picture of the scarf on the 1/2" piece along with others showing the whole stringer being clamped together.
[www.sailmfg.com]
[www.sailmfg.com]
[www.sailmfg.com]
[www.sailmfg.com]
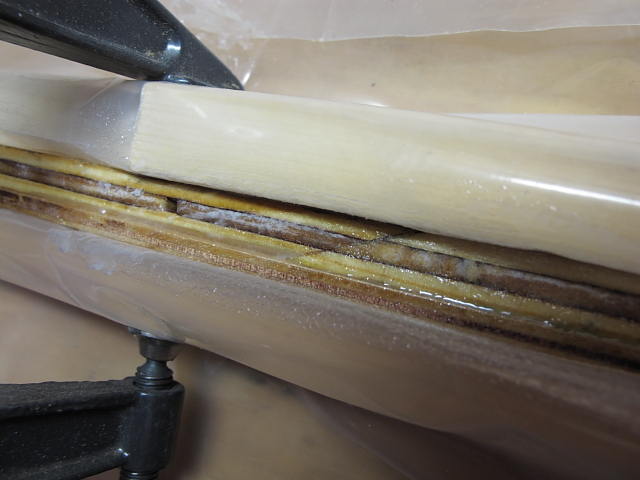
I first wet out each board with regular epoxy resin, than I mixed a thickener with the remaining mixture. This was then put on one of the boards and spread evenly. The 1/4" pieces were then placed on the thickened resin and clamped together. Where I didn't have enough clamps I used deck screws to help clamp it all together.
[www.sailmfg.com]
Tomorrow I will cut it to size and shape and do a test fit.
Joe
Sidewinder #327
Edited 4 time(s). Last edit at 06/16/2010 04:46AM by Joe.
Instead I decided to use what I had on hand. 48x48 inch 1/2 plywood and some 1/4" plywood. When added together they are slightly thicker than the original stringer.
[www.sailmfg.com]
[www.sailmfg.com]
Since the plywood I had was too short I tried my hand at scarfing two pieces together. When I laminated the 1/4" pieces to the 1/2" pieces I staggered the scarf to prevent weakness. Ideally you want a longer scarf, but thats the greatest angle I can make on my table saw. Here is a picture of the scarf on the 1/2" piece along with others showing the whole stringer being clamped together.
[www.sailmfg.com]
[www.sailmfg.com]
[www.sailmfg.com]
[www.sailmfg.com]
I first wet out each board with regular epoxy resin, than I mixed a thickener with the remaining mixture. This was then put on one of the boards and spread evenly. The 1/4" pieces were then placed on the thickened resin and clamped together. Where I didn't have enough clamps I used deck screws to help clamp it all together.
[www.sailmfg.com]
Tomorrow I will cut it to size and shape and do a test fit.
Joe
Sidewinder #327
Edited 4 time(s). Last edit at 06/16/2010 04:46AM by Joe.
|
Re: Sidewinder Rebuild June 17, 2010 03:42AM |
Registered: 13 years ago Posts: 78 |
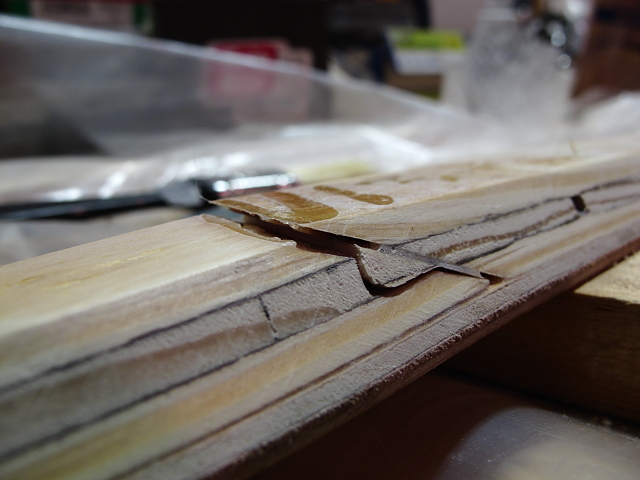
Just as I figured, my scarf joint angle on the1/2" plywood was to great, it didn't take much pressure at all before it failed. I decided to cut it to shape and length anyway. I cut it so that the broken joint is on the top of the stringer, this way any forces (my weight) would force it together. I also used a technique from my model airplane days and put two pieces of fiberglass cloth on top of the stringer over the broken joint to strengthen it. It will probably be a non-issue once the repair hardens.
The new stringer.....
[www.sailmfg.com]
The broken joint....
[www.sailmfg.com]
The repair....
[www.sailmfg.com]
Life gave me a lemon this morning, and tonight I made lemonade.
Joe
Sidewinder #327
The new stringer.....
[www.sailmfg.com]
The broken joint....
[www.sailmfg.com]
The repair....
[www.sailmfg.com]
Life gave me a lemon this morning, and tonight I made lemonade.
Joe
Sidewinder #327
|
Re: Sidewinder Rebuild June 24, 2010 01:30AM |
Registered: 13 years ago Posts: 6 |
In the end, the true strength of your piece will be the cloth and resin. If I would have seen this earlier, I would have advised you to just go for a piece of pine. You were talking about buying 3/4 ply to make it, so that tells me a decent piece of 1 x stock could have been cut down for it or if you needed something thicker, a piece of 2 x. The tough thing about ply is that until you have a reasonably wide piece most of the strength of the cross plys is not really realized and it is just a bunch of short pieces of cross grained wood glued together with very narrow pieces of long grain. Each piece of short grain is nothing but a series of potential break points and the long grain isn't wide enough to give much help, which is where your problem came in. As far as a need for hardwood,vs softwood, remember that a lot of airplanes are built with Sitka Spruce, which is, in the end, a piece of pine that grows tall enough without branches (which equals knots which equals weak points) to give decent size pieces of clear lumber. Yes, I am a woodworker, and I do realize Sitka is more like super pine, but again, the true strength is in the cloth and resin. Bottom line, after you glassed the wood, along with the cloth that is obviously there from your photo, you created a solid piece of wood / resin. The piece of solid wood would have had more structural strength, but not a lot more. I usually find that if I buy a piece of 1 x 12, it has a lot of knot free lumber in it, even if I'm doing a big box store lumber purchase. 1 x 12 usually equals a piece of shelving, and even the typical consumer doesn't accept a ton on knots in their shelves.
As far as my project goes, my issue isn't material, it's time. Should have started in January.
As far as my project goes, my issue isn't material, it's time. Should have started in January.
|
Re: Sidewinder Rebuild June 28, 2010 02:47AM |
Registered: 13 years ago Posts: 78 |
It's been awhile since posting, but the temps have been in the upper 90's lately and I'm not too keen on working in it all day then coming home and spending more time in it working on my boat. Then the AC went out in the house, so it's actually cooler outside now. Here is what I accomplished today......
After sanding and cleaning up the area with acetone, I wet both the stringer and the hull with non-thickened resin. I thickened the remianing resin with filler to about peanut butter consistancy and spread this on the hull. This was easier said then done. Also when you use filler be sure to mix more than you think you'll need. I didn't.
Here is the stringer being held in place with whatever I could find.
[www.sailmfg.com]
Here are some pics of the final product waiting for cleanup.
[www.sailmfg.com]
[www.sailmfg.com]
[www.sailmfg.com]
[www.sailmfg.com]
Here is why I wish I'd mixed up more resin........
[www.sailmfg.com]
I really wanted more resin here to fill in the gaps. I'll fill it in when I start to lay the cloth over the floor.
The weather looks good this week along with a one day work week so I hope to be posting a completed floor by Friday. Fire up the barbee! I got a hankerin' for some elephant!!!
Everyone have a good week.
Joe
Sidewinder #327
|
Re: Sidewinder Rebuild July 02, 2010 03:43AM |
Registered: 13 years ago Posts: 78 |
On my facebook album I stated, I was only going for functionally fun with this restoration. If it turned out looking good, that would be a plus. Well tonight I may have gone more towards the functional side instead of looks. We'll see if I can clean it up tomorrow.
Here are some before and after pictures........
Before:
[www.sailmfg.com]
[www.sailmfg.com]
After:
[www.sailmfg.com]
[www.sailmfg.com]
First I made up some thickened resin and made fillets the best I could. Then I tore up some matting and worked it into the fillets. This was topped with a layer of cloth followed by matting and then finally cloth.
(Fillet + mat + cloth + mat + cloth)
The hardest part was working out the air between each layer.
Joe
Sidewinder #327
|
Re: Sidewinder Rebuild July 05, 2010 04:32PM |
Registered: 13 years ago Posts: 78 |
This holiday weekend was loaded with much more then I expected, so I haven't had as much time as I'd hoped to work on my boat. Isn't that how it goes though.
More resin and cloth was needed after the last repair. Now I know a whole gallon should've been bought to begin with. I've already spent the same amount but I've only gotten 3 qts. Live and learn.
After being called into work on the 4th, I did get about an hour and a half to work on it. Mostly I did the dirty job of grinding on my mess and prepping a few other areas.
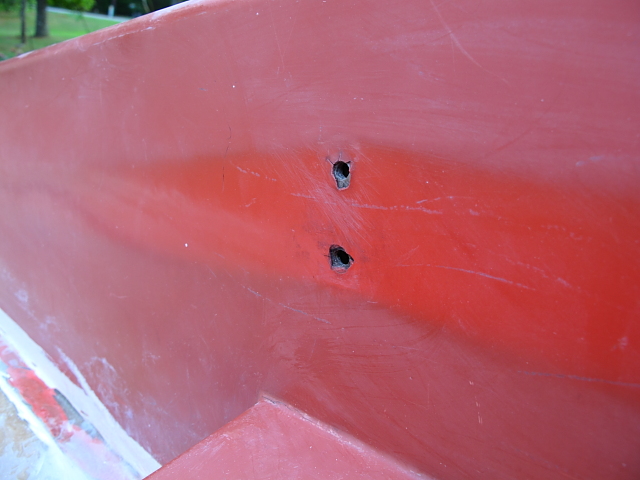
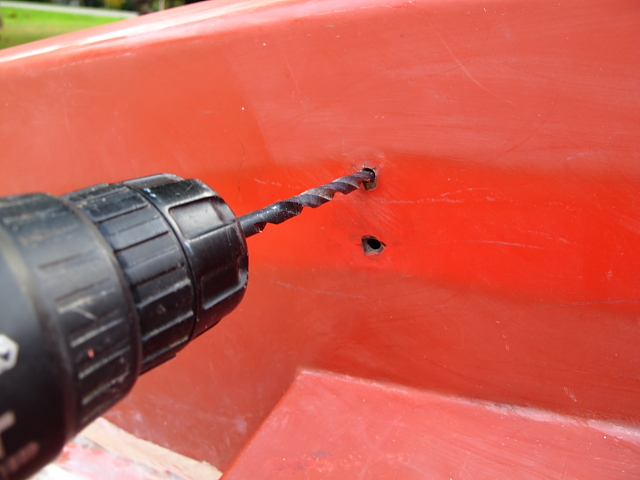
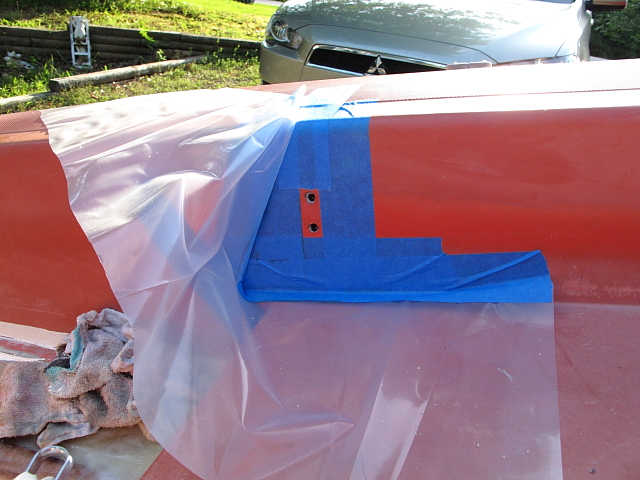
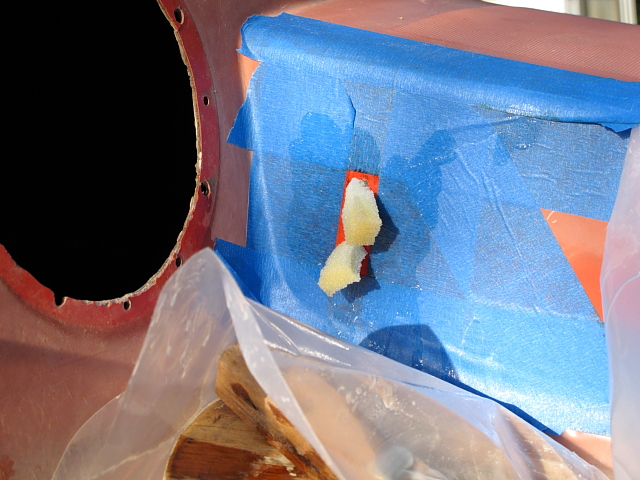
On these boats there are straps that run along the cockpit sides for you to put your feet in. The straps needed to be replaced and when removing the retainers, I noticed a few of the screws were stripped out and loose. The manual I got from West Systems shows a clever repair for just such scenarios. It involves drilling out the hole oversized, and soaking an even larger piece of foam with resin. The foam piece is rolled small enough to fit the hole and then put in to dry. When the foam expands it fills the hole and provides a good surface to drill and retap for screws.
Below are pics of the original hole and the new larger hole. I only went as large as my biggest drill bit. Maybe bigger would be better.
[www.sailmfg.com]
[www.sailmfg.com]
[www.sailmfg.com]
Here is the prep work for another area needing repair. This is located on the outside area where the centerboard goes in. Some before and after pics.....
[www.sailmfg.com]
[www.sailmfg.com]
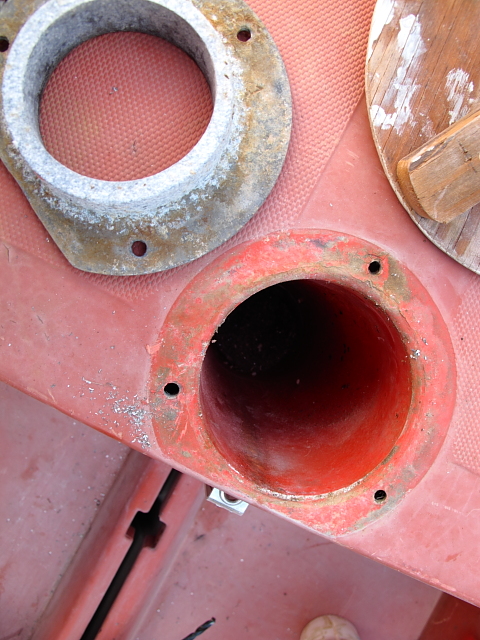
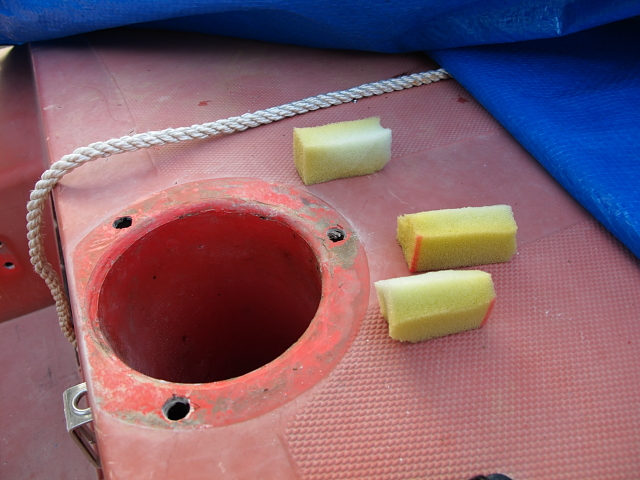
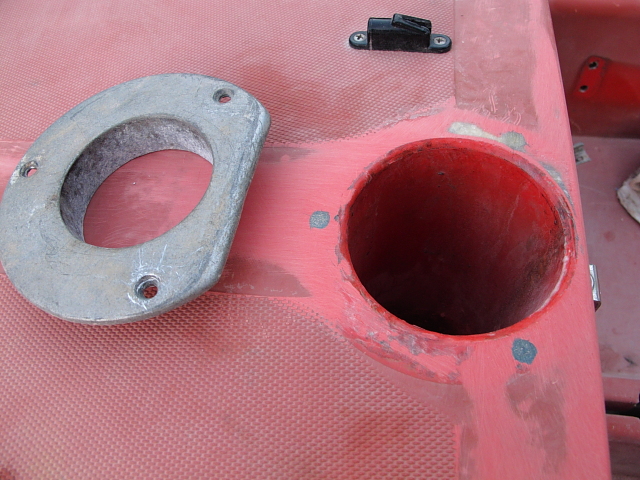
Since I'm not scared to dig deeper, I decided to remove the mast socket to repair loose screws here. The same procedure will be used as with the strap retainers.
[www.sailmfg.com]
[www.sailmfg.com]
[www.sailmfg.com]
[www.sailmfg.com]
This socket is a tube, that's integral with the top deck, and goes all the way to the hull. It goes into what looks like a glob of concrete surrounded by the same woven cloth the hull is made of. My next time working on it, I'll get some pics of the inside of the hull.
Joe
Sidewinder #327
Edited 1 time(s). Last edit at 07/05/2010 04:34PM by Joe.
More resin and cloth was needed after the last repair. Now I know a whole gallon should've been bought to begin with. I've already spent the same amount but I've only gotten 3 qts. Live and learn.
After being called into work on the 4th, I did get about an hour and a half to work on it. Mostly I did the dirty job of grinding on my mess and prepping a few other areas.
On these boats there are straps that run along the cockpit sides for you to put your feet in. The straps needed to be replaced and when removing the retainers, I noticed a few of the screws were stripped out and loose. The manual I got from West Systems shows a clever repair for just such scenarios. It involves drilling out the hole oversized, and soaking an even larger piece of foam with resin. The foam piece is rolled small enough to fit the hole and then put in to dry. When the foam expands it fills the hole and provides a good surface to drill and retap for screws.
Below are pics of the original hole and the new larger hole. I only went as large as my biggest drill bit. Maybe bigger would be better.
[www.sailmfg.com]
[www.sailmfg.com]
[www.sailmfg.com]
Here is the prep work for another area needing repair. This is located on the outside area where the centerboard goes in. Some before and after pics.....
[www.sailmfg.com]
[www.sailmfg.com]
Since I'm not scared to dig deeper, I decided to remove the mast socket to repair loose screws here. The same procedure will be used as with the strap retainers.
[www.sailmfg.com]
[www.sailmfg.com]
[www.sailmfg.com]
[www.sailmfg.com]
This socket is a tube, that's integral with the top deck, and goes all the way to the hull. It goes into what looks like a glob of concrete surrounded by the same woven cloth the hull is made of. My next time working on it, I'll get some pics of the inside of the hull.
Joe
Sidewinder #327
Edited 1 time(s). Last edit at 07/05/2010 04:34PM by Joe.
|
Re: Sidewinder Rebuild July 05, 2010 08:52PM |
Registered: 13 years ago Posts: 78 |
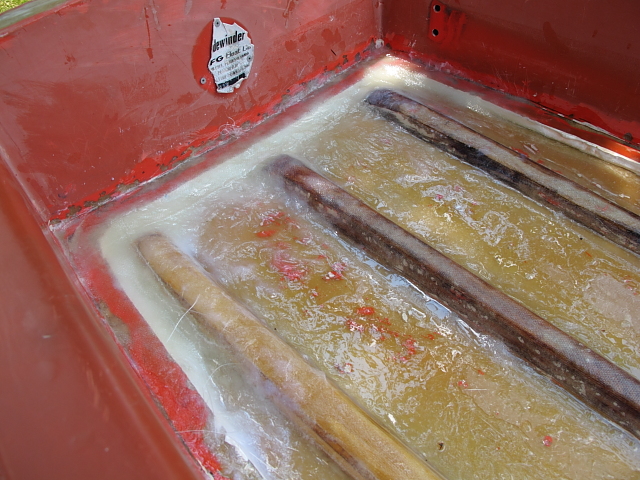
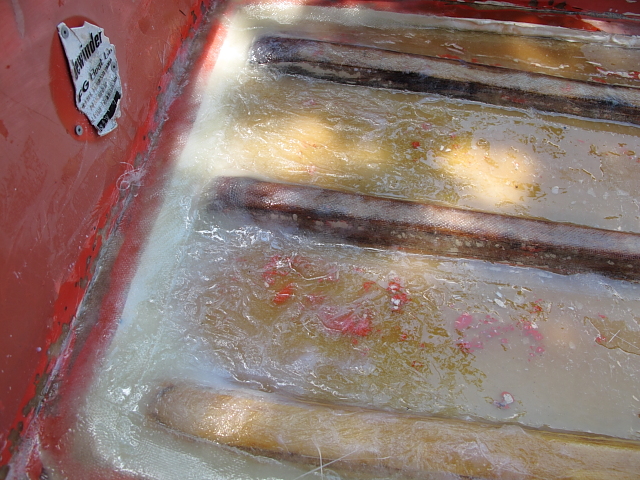
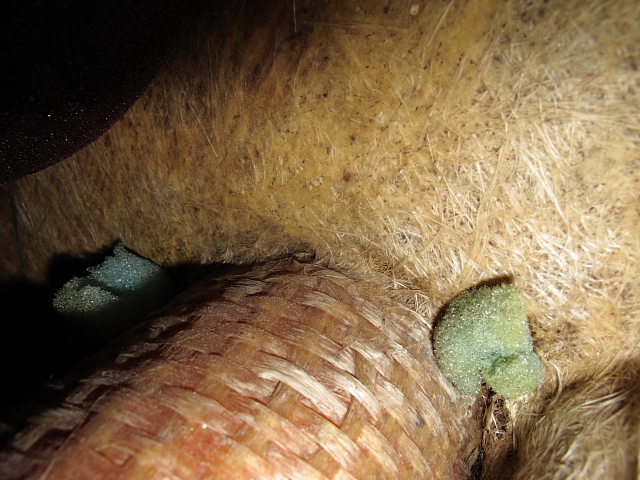
Got out to work for a while before being called into work yet again. I did manage to get the stringers covered with three strips of cloth and the rear of the cockpit filled in with fillets, mat and cloth. I've also taken a picture of the mast tube inside the hull.
[www.sailmfg.com]
[www.sailmfg.com]
This picture was taken from inside the hull, through the holes in the deck. It was taken facing back towards the cockpit. You can see the front edge of the centerboard pocket in the hull.
[www.sailmfg.com]
Joe
Sidewinder #327
[www.sailmfg.com]
[www.sailmfg.com]
This picture was taken from inside the hull, through the holes in the deck. It was taken facing back towards the cockpit. You can see the front edge of the centerboard pocket in the hull.
[www.sailmfg.com]
Joe
Sidewinder #327
|
Re: Sidewinder Rebuild July 07, 2010 03:54AM |
Registered: 13 years ago Posts: 78 |
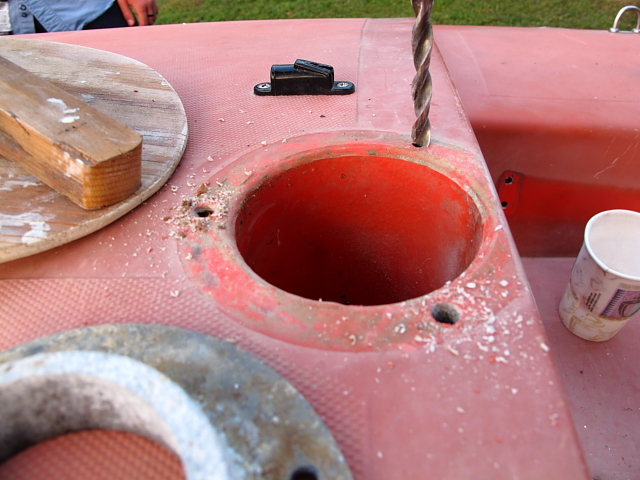
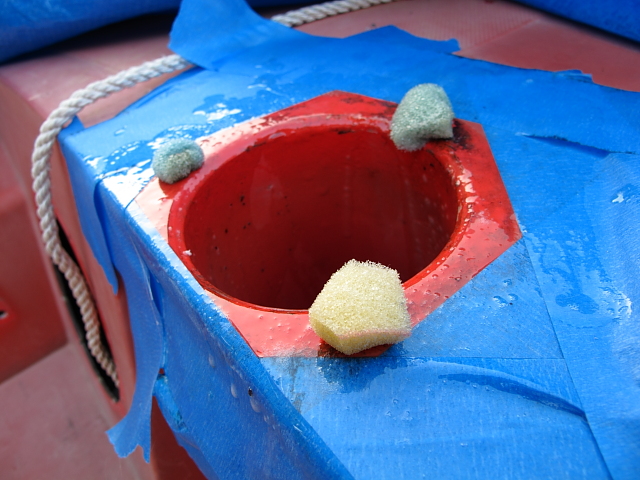
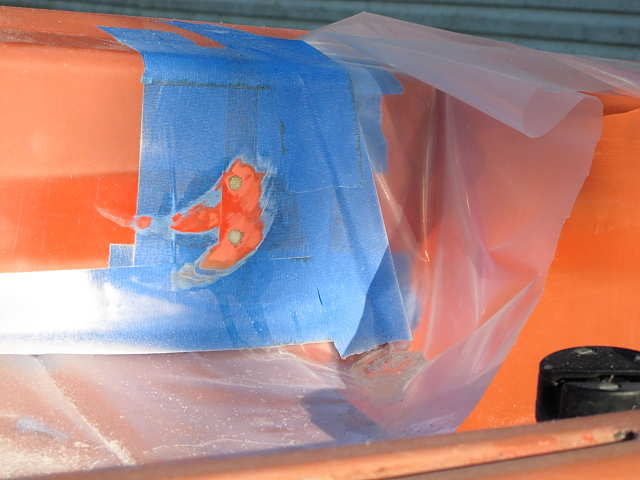
I had a chance to try the repairs described earlier using foam. I tried it on the mast socket screw holes since they are on a horizontal surface, therefore less mess. The pictures are self explanitory......
[www.sailmfg.com]
[www.sailmfg.com]
[www.sailmfg.com]
[www.sailmfg.com]
[www.sailmfg.com]
The foam that was sticking out the bottom did not have much resin left in it, and I was able to pull it off from the underside. I'll see how well it works once I drill the new holes for the screws. The forces in this area are only lateral, unlike the straps that will be pulled on. If this method doesn't work for the straps I may be forced to relocate them.
Joe
Sidewinder #327
Edited 1 time(s). Last edit at 07/07/2010 03:58AM by Joe.
[www.sailmfg.com]
[www.sailmfg.com]
[www.sailmfg.com]
[www.sailmfg.com]
[www.sailmfg.com]
The foam that was sticking out the bottom did not have much resin left in it, and I was able to pull it off from the underside. I'll see how well it works once I drill the new holes for the screws. The forces in this area are only lateral, unlike the straps that will be pulled on. If this method doesn't work for the straps I may be forced to relocate them.
Joe
Sidewinder #327
Edited 1 time(s). Last edit at 07/07/2010 03:58AM by Joe.
|
Re: Sidewinder Rebuild July 16, 2010 03:25AM |
Registered: 13 years ago Posts: 78 |
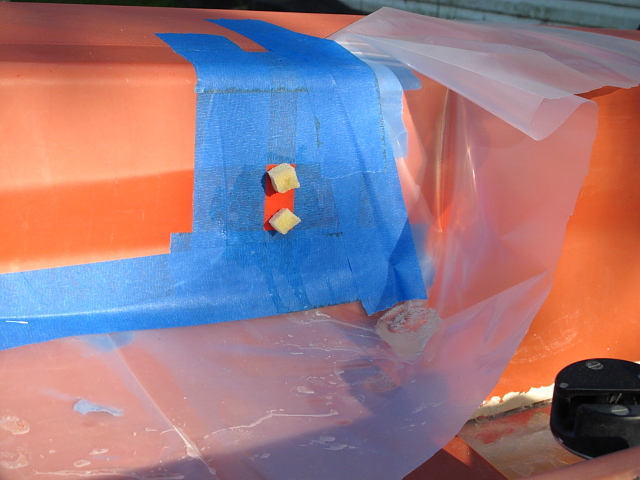
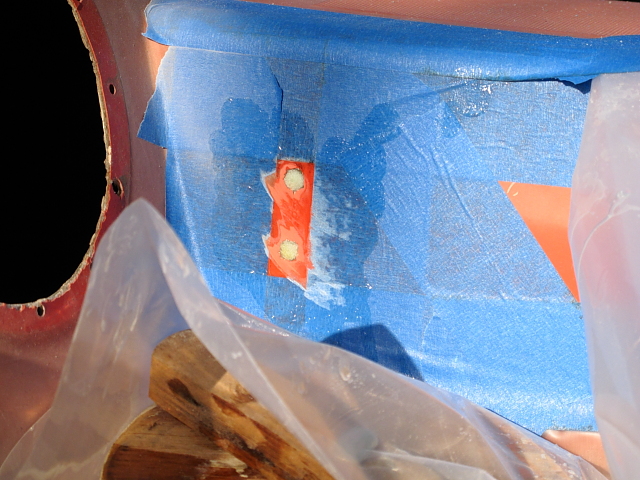
I finally tried the foam and resin trick on the holes for the foot strap retainers. Once again most of the resin gets squeezed out when rolling and forcing the foam into the hole. I ended up using a nail head to help push it into the hole. I'm certain this procedure would be easier and more effective if used on a much bigger hole. I will probably end up relocating the strap retainers to another location since I don't trust the integrity of this repair.
Here are some pictures.....
[www.sailmfg.com]
[www.sailmfg.com]
[www.sailmfg.com]
[www.sailmfg.com]
[www.sailmfg.com]
I plan to tackle the big hole this weekend. Wish me luck!!!
Joe
Sidewinder #327
Here are some pictures.....
[www.sailmfg.com]
[www.sailmfg.com]
[www.sailmfg.com]
[www.sailmfg.com]
[www.sailmfg.com]
I plan to tackle the big hole this weekend. Wish me luck!!!
Joe
Sidewinder #327
|
Re: Sidewinder Rebuild July 18, 2010 04:27PM |
Registered: 13 years ago Posts: 78 |
Ok, it wont be long now and you'll never hear from me again. I accomplished quite a bit yesterday with the fiberglass work on my boat. I finally bit the big one and bought a gallon of resin and a quart of hardener. It's nice to be able to continue mixing and working and then more mixing. It's amazing how much you can get done when you're not concerned about running out of resin.
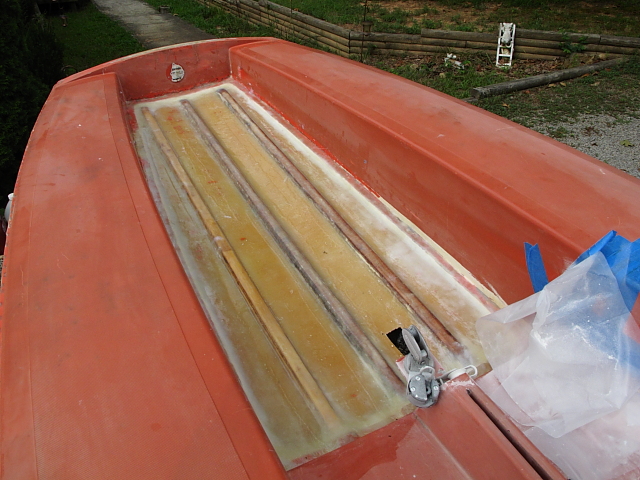
I finally have my floor all sealed in. All that's left is sanding down and reworking some bubbles, then a layer of glass matting to help smooth things out. Here are some pics from yesterdays work.....
[www.sailmfg.com]
[www.sailmfg.com]
[www.sailmfg.com]
I was also able to start the repair of the hole near the center board slot. Here is a before, during and (nearly) after picture......
[www.sailmfg.com]
[www.sailmfg.com]
[www.sailmfg.com]
That last repair was done using three layers of cloth followed by many small pieces of matting. I first started with a large piece of cloth followed by two progressively smaller pieces. These were cut to the shape of the repair. I then used as much matting as needed to get the thickness I was looking for. The matting works pretty good when you tear off what ever size or shape you need. This way you're not left with the hard edge after cutting with scissors. I'll be able to see the while story once I start to sand and finish it.
One other thing that helped yesterday was a new roller I picked up for working the resin/glass repairs. It's about a 3-4" ribbed plastic roller thats less then 1" in diameter. It helps get out any air and work the resin in to the matting or cloth. Be sure to clean this up after each use, or you'll end up with a $14 non-rolling ribbed roller.
BTW an update on the usefullness of the pump system. It is WELL worth the money. It has continued to work well, although the hardener pump seems to empty it's can a little early. Probably operator error. So far I've pumped about a gallon through them with no clogging what so ever. No cleanup either....when I'm done I leave the pumps in place and put the cans in my 95+ degree shed.
Joe
Sidewinder #327
|
Re: Sidewinder Rebuild July 31, 2010 10:37PM |
Registered: 13 years ago Posts: 78 |
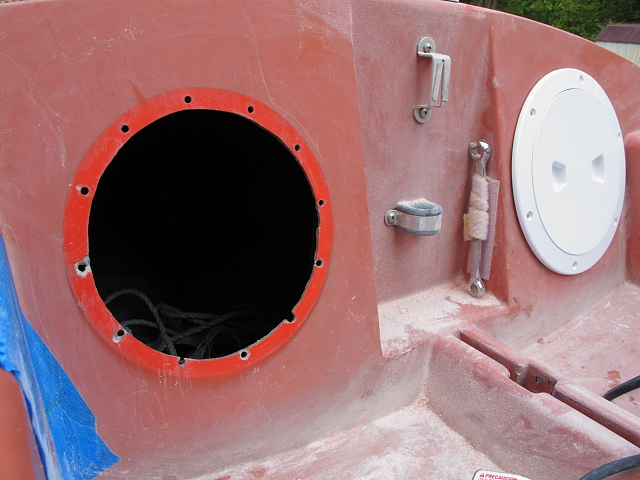
First let me state how much I am not a fan of the summer heat. This is the #1 reason little work has done to my boat lately. Looks like 100's the first part of the week, so my current pace will continue. I've also learned that patience has been on my side with this project. I've been needing replacement covers for the two holes in the front of the boat. I've wanted to pick them up everytime I've been to the boat store, but chose to wait. Well yesterday I went and since I didn't need resin, I decided to pick them up. To my surprise they had them 1/2 off for this weekend. I ended up getting new drainplugs and various stainless screws and bolts, cheaper then I would've paid for two at regular price. To top that I found a five dollar bill at the movie theater.
Here is the rear transom plug. It originally had a carved up 1" plug in it. I was happy to find a 7/8" plug and with a little adjustment of the hole, it fits perfectly.
[www.sailmfg.com]
I will attach a small piece of cord to it and the rudder bracket to prevent loss at sea.
(Ok, more like a lake.......or big pond.)
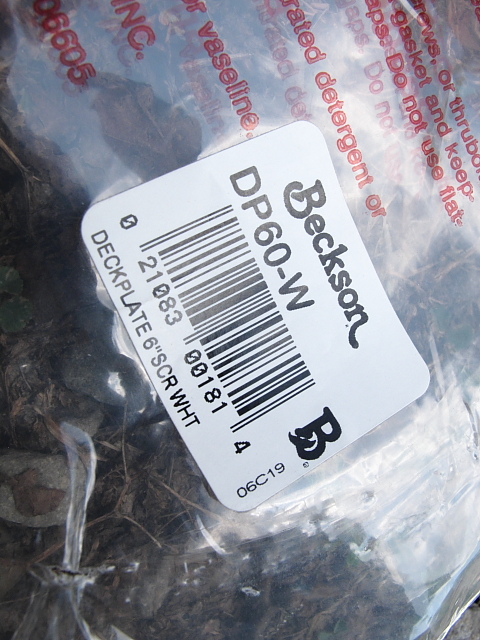
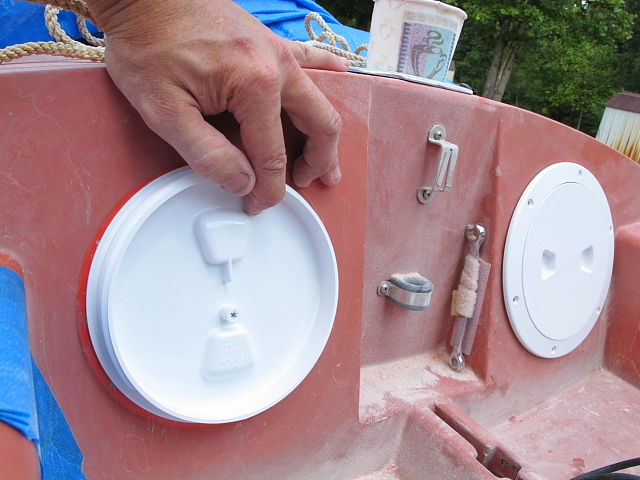
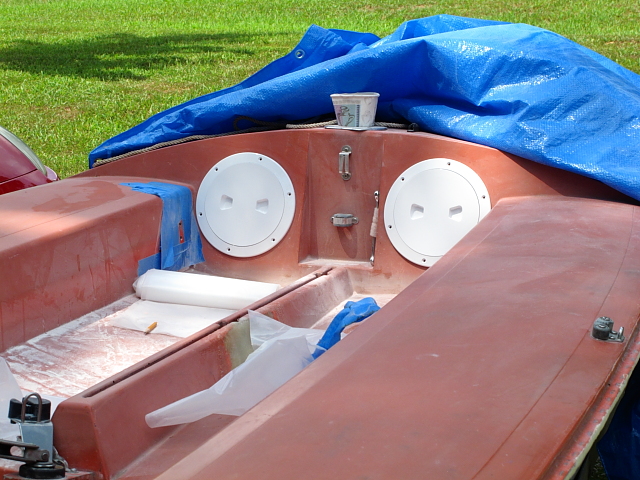
Here is the installation of the covers. They are 6" hatch covers from Beckson. $20
[www.sailmfg.com]
[www.sailmfg.com]
[www.sailmfg.com]
To determine what size hole to cut, just remove the lid, flip it over and trace the edge with a pencil. You can see on the underside of the cover there is a place to attach a screw. I will probably run a cable from one cover through the holes to the other, to again prevent "loss at sea".
[www.sailmfg.com]
[www.sailmfg.com]
I used a dremel tool to grind out the hole on the first hole. 15-20mins. The second hole I used a jigsaw with a "Downcut" laminate blade.(It's used for laminate flooring) 5mins. If you take your time it makes a clean cut with no cracking of the gelcoat.
Joe
Sidewinder #327
Here is the rear transom plug. It originally had a carved up 1" plug in it. I was happy to find a 7/8" plug and with a little adjustment of the hole, it fits perfectly.
[www.sailmfg.com]
I will attach a small piece of cord to it and the rudder bracket to prevent loss at sea.
(Ok, more like a lake.......or big pond.)
Here is the installation of the covers. They are 6" hatch covers from Beckson. $20
[www.sailmfg.com]
[www.sailmfg.com]
[www.sailmfg.com]
To determine what size hole to cut, just remove the lid, flip it over and trace the edge with a pencil. You can see on the underside of the cover there is a place to attach a screw. I will probably run a cable from one cover through the holes to the other, to again prevent "loss at sea".
[www.sailmfg.com]
[www.sailmfg.com]
I used a dremel tool to grind out the hole on the first hole. 15-20mins. The second hole I used a jigsaw with a "Downcut" laminate blade.(It's used for laminate flooring) 5mins. If you take your time it makes a clean cut with no cracking of the gelcoat.
Joe
Sidewinder #327
|
Re: Sidewinder Rebuild August 08, 2010 01:07AM |
Registered: 13 years ago Posts: 78 |
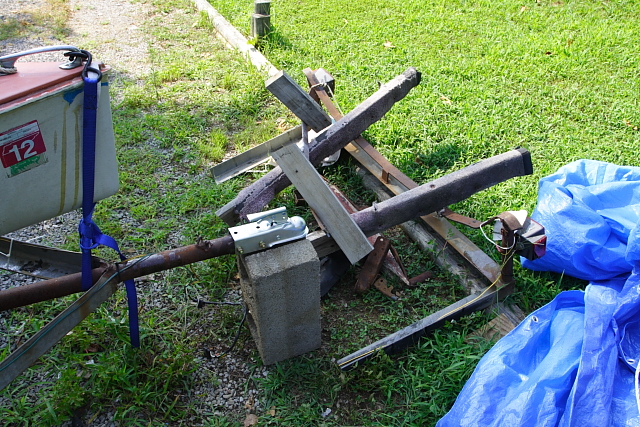
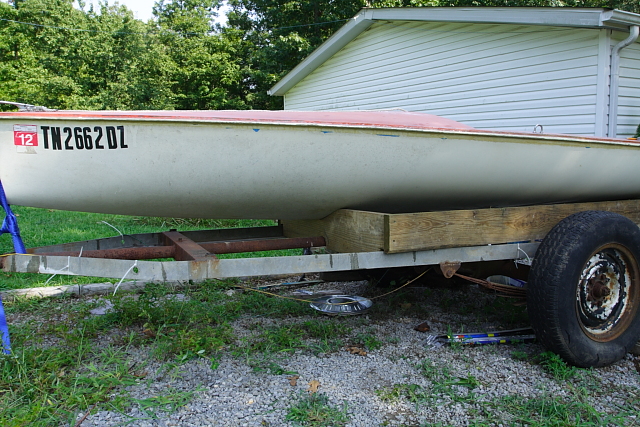
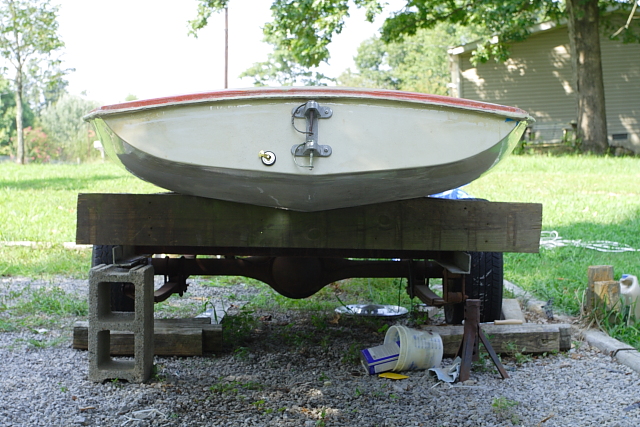
Today was a day to make my boat more "road worthy". I probably have the worst trailer ever made, but it did get it home from the previous owners house. (About 50 long miles) The frame is not square and the axle is from an old pickup truck. I only plan to transport it a few times a year, so I decided to do what I could to it. I am lucky enough to have a marina nearby that has what they call Laser Slips. Basically it is a carpeted shoreline that has a pole you tie off to. This way I can leave the mast stepped and ready to run. 20 minutes from work!!!
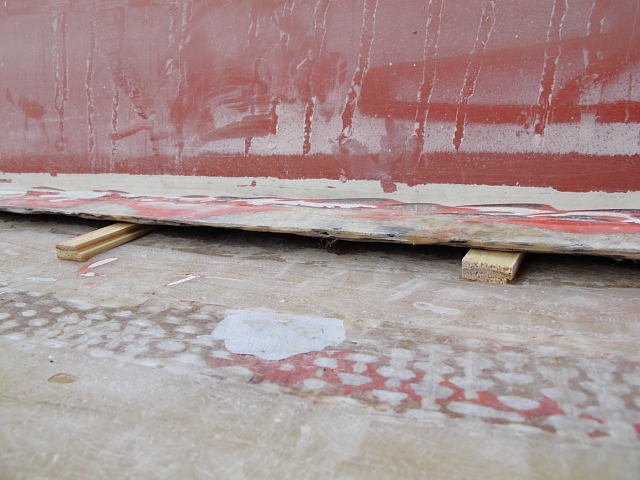
First the trailer had to lose some wieght.
[www.sailmfg.com]
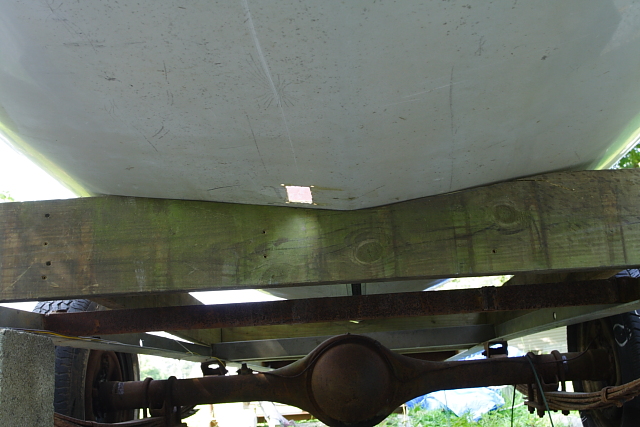
Then I had to make a support for the front.
[www.sailmfg.com]
This support sits directly under a support built into the hull.
The rear support was made.
[www.sailmfg.com]
Notice the heavy duty axle? Not sure what year it is, but it has bolts instead of lugnuts. Might be a Japanese truck axle.
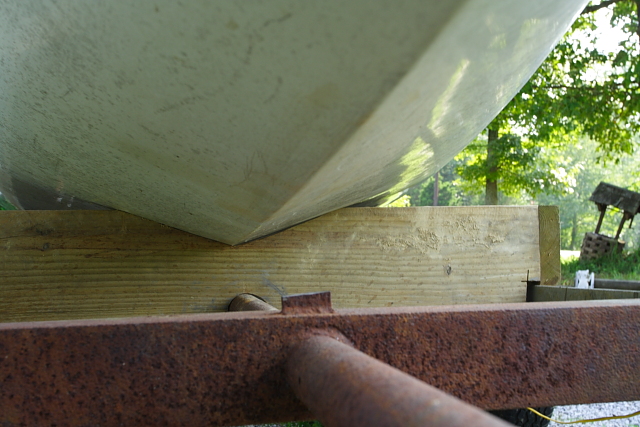
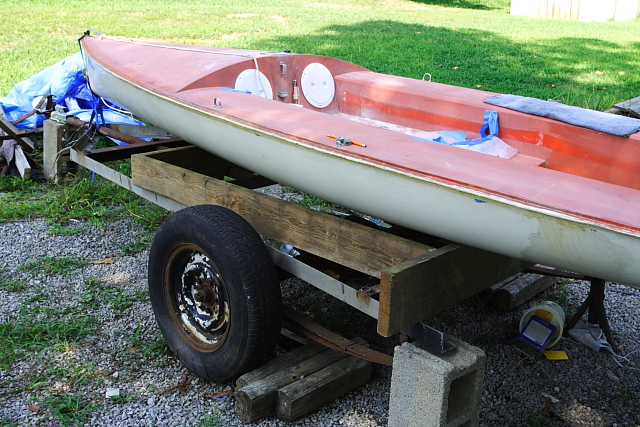
I made a template out of foam-core poster board and transferred it to a 2x8 piece of treated lumber left over from a deck demolition. The foamcore is easy to cut with a knife, and besides I didn't have any cardbord handy. The fit of the wood was then fine tuned using my grinder with a sanding wheel. I highly recommend this tool if you are venturing into boat repair. I bought a 4 1/2" Milwaukee from Home Depot. It grinds, sands and cuts.
The front and rear supports where then connected to each other using 2x6 pieces of treated lumber from the same deck. I actually made a box that sits on the trailer. So I can use this box later at the shoreline slip, it will not be permanently attached to the trailer. The box will be strapped to the trailer during transport, then after the boat is in the water, I will carry it to the slip. This way the boat will have a cradle to sit on.
[www.sailmfg.com]
[www.sailmfg.com]
[www.sailmfg.com]
[www.sailmfg.com]
After looking at my pictures, I really need to look for a better trailer. Maybe a single jetski trailer.
Joe
Sidewinder #327
First the trailer had to lose some wieght.
[www.sailmfg.com]
Then I had to make a support for the front.
[www.sailmfg.com]
This support sits directly under a support built into the hull.
The rear support was made.
[www.sailmfg.com]
Notice the heavy duty axle? Not sure what year it is, but it has bolts instead of lugnuts. Might be a Japanese truck axle.
I made a template out of foam-core poster board and transferred it to a 2x8 piece of treated lumber left over from a deck demolition. The foamcore is easy to cut with a knife, and besides I didn't have any cardbord handy. The fit of the wood was then fine tuned using my grinder with a sanding wheel. I highly recommend this tool if you are venturing into boat repair. I bought a 4 1/2" Milwaukee from Home Depot. It grinds, sands and cuts.
The front and rear supports where then connected to each other using 2x6 pieces of treated lumber from the same deck. I actually made a box that sits on the trailer. So I can use this box later at the shoreline slip, it will not be permanently attached to the trailer. The box will be strapped to the trailer during transport, then after the boat is in the water, I will carry it to the slip. This way the boat will have a cradle to sit on.
[www.sailmfg.com]
[www.sailmfg.com]
[www.sailmfg.com]
[www.sailmfg.com]
After looking at my pictures, I really need to look for a better trailer. Maybe a single jetski trailer.
Joe
Sidewinder #327
|
Re: Sidewinder Rebuild August 23, 2010 03:09AM |
Registered: 13 years ago Posts: 78 |
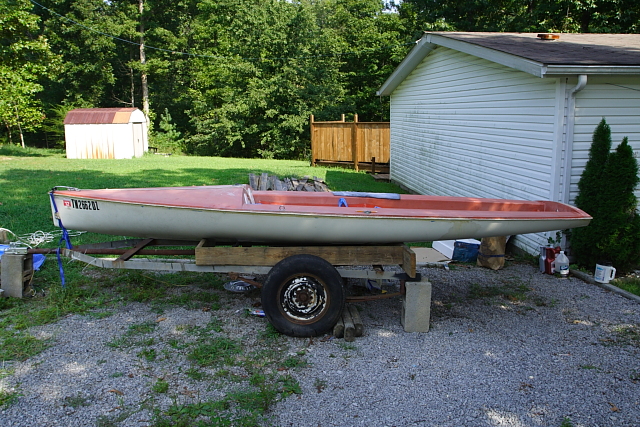
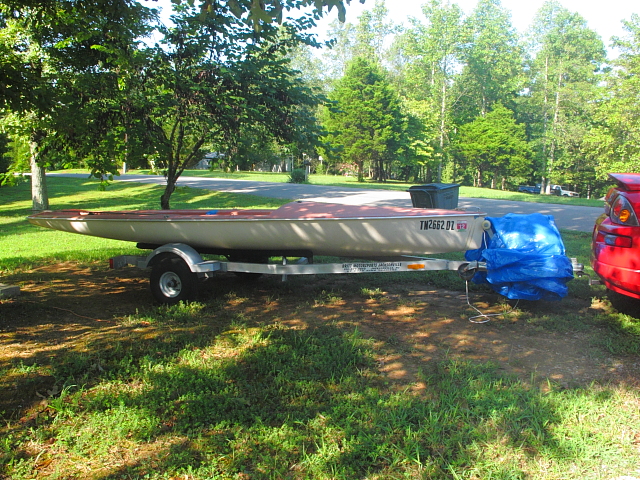
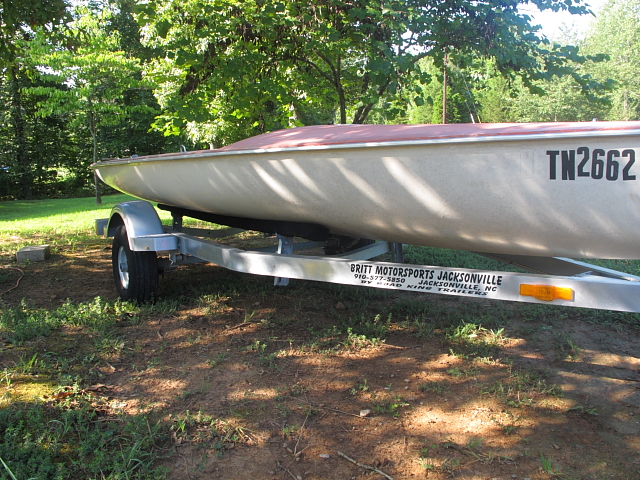
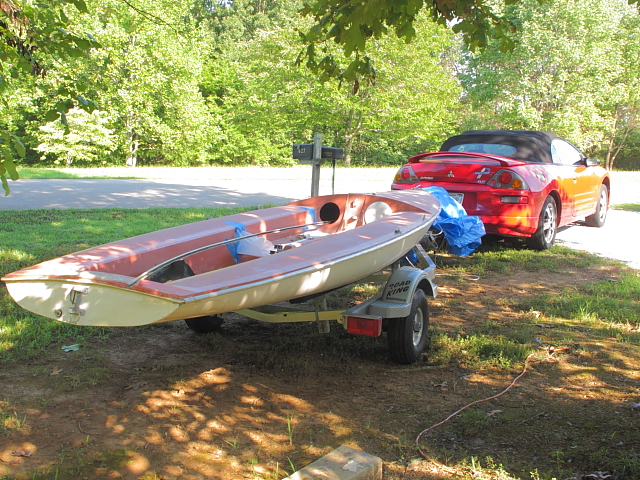
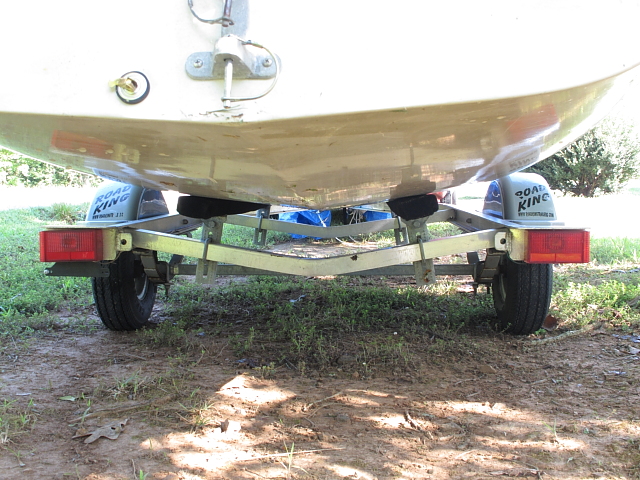
Well I took my own advice and picked up another trailer for my boat. It's a 2007 aluminum jet ski trailer that works like a charm. Here are some pics. The price of this trailer was only about $150 more then what it would've taken to get the old one reliable. And it weighs about 100 lbs less.
[www.sailmfg.com]
[www.sailmfg.com]
[www.sailmfg.com]
[www.sailmfg.com]
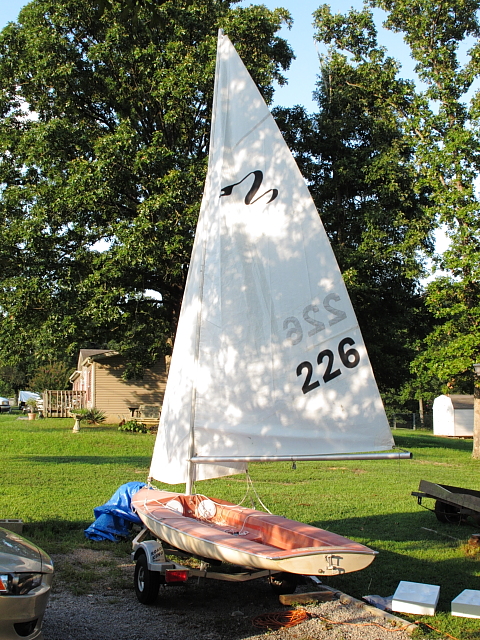
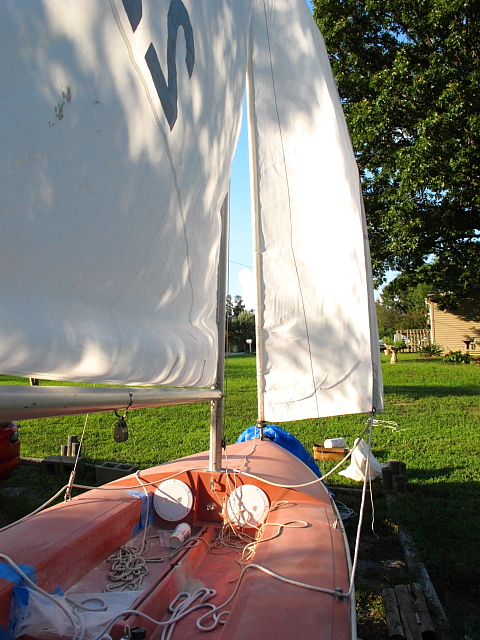
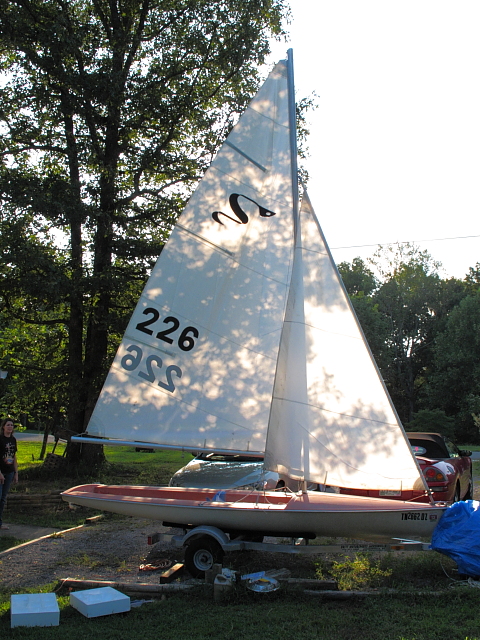
I also brought out my rigging for a little inspiration to get this thing in the water.
[www.sailmfg.com]
[www.sailmfg.com]
[www.sailmfg.com]
My order of setup went as follows.
1. Connect the two mast pieces together.
2. String the halyard for main and secure it to the cleat to keep it out of the way.
3. Stand your mast upright and slowly walk it over to boat.
4. Lift the mast and carefully place it in socket.
5. Hook top part of jib on mast hook.(Trickiest part of the whole process)
6. Attach both side stays, then the lower jib pole pin.
7. Put the battens in sail pockets
8. Attach the main sail to boom front and rear.
9. Hook the halyard to main and run it all the way up the mast.(This went surprisingly smooth)
10. Tie off halyard and tighten and secure down-haul
11. Run the sheets for the jib and main
12. Dream of blue water and a cool breeze.
Raising the mast does take a bit of strength, just take your time and keep control of it. If it starts to go over just lower it down to the ground next to your foot and regain balance. This may not work in a brisk wind, but everything was done today from outside the boat. If it gets real windy, you may have to step the mast from inside the boat for more control. I chose to step the mast without the jib pole attached to make it lighter and easier to control. It did however take a few tries before I was able to hook the hook with the end of the jib pole.
An update on the wooden cradle I made. After sitting on it for only a few weeks the hull was starting to indent where it touched the cradle. I will end up putting runners front to back before I use it. The cradle doesn't seem to be the best setup for support.
I'm sure glad my to do list is growing shorter. Just in time for cooler weather.
Joe
Sidewinder #327
[www.sailmfg.com]
[www.sailmfg.com]
[www.sailmfg.com]
[www.sailmfg.com]
I also brought out my rigging for a little inspiration to get this thing in the water.
[www.sailmfg.com]
[www.sailmfg.com]
[www.sailmfg.com]
My order of setup went as follows.
1. Connect the two mast pieces together.
2. String the halyard for main and secure it to the cleat to keep it out of the way.
3. Stand your mast upright and slowly walk it over to boat.
4. Lift the mast and carefully place it in socket.
5. Hook top part of jib on mast hook.(Trickiest part of the whole process)
6. Attach both side stays, then the lower jib pole pin.
7. Put the battens in sail pockets
8. Attach the main sail to boom front and rear.
9. Hook the halyard to main and run it all the way up the mast.(This went surprisingly smooth)
10. Tie off halyard and tighten and secure down-haul
11. Run the sheets for the jib and main
12. Dream of blue water and a cool breeze.
Raising the mast does take a bit of strength, just take your time and keep control of it. If it starts to go over just lower it down to the ground next to your foot and regain balance. This may not work in a brisk wind, but everything was done today from outside the boat. If it gets real windy, you may have to step the mast from inside the boat for more control. I chose to step the mast without the jib pole attached to make it lighter and easier to control. It did however take a few tries before I was able to hook the hook with the end of the jib pole.
An update on the wooden cradle I made. After sitting on it for only a few weeks the hull was starting to indent where it touched the cradle. I will end up putting runners front to back before I use it. The cradle doesn't seem to be the best setup for support.
I'm sure glad my to do list is growing shorter. Just in time for cooler weather.
Joe
Sidewinder #327

Sorry, only registered users may post in this forum.